
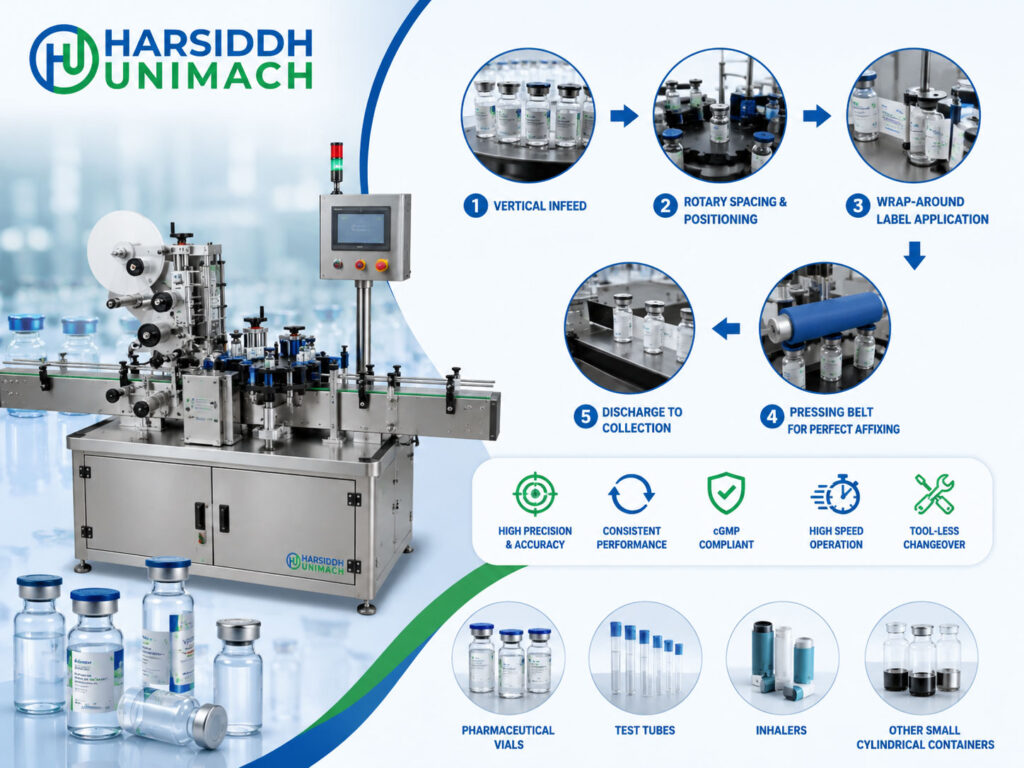
Every injectable vial that leaves a pharmaceutical plant carries a label with essential information: the drug name, strength, volume, route of administration, storage instructions, batch number and expiry date. In a hospital, a nurse or pharmacist may identify the vial from that label alone, so it must be correct, legible and firmly attached, even after refrigeration, handling and time on a shelf.
A vial sticker labeling machine applies these self-adhesive labels automatically, accurately and gently. In this article, we explain how a vial labeller works, from the moment sealed vials enter the machine to the moment they leave labelled and coded. We cover the label path, how labels are wrapped around small vial diameters, how coding and inspection are integrated, how to set the machine up correctly and how to troubleshoot common problems.
If you are new to self-adhesive labelling, our sticker labeling machine working principle explains the general concept that all sticker labellers share.
Where Vial Labelling Fits in the Injectable Line
A typical liquid injectable vial line runs:
- Vial washing, for example on a rotary vial washing machine
- Depyrogenation in a sterilizing tunnel
- Filling and rubber stoppering, for example on a liquid vial filling machine with rubber stoppering, or a complete automatic liquid vial filling line
- Aluminium cap sealing, for example on a vial cap sealing machine (1, 4, 6, 8 head) or an Automatic Eight Head Vial Cap Sealing Machine
- External vial washing, on an automatic external vial washing machine, to remove product traces and leave a clean, dry surface
- Visual inspection
- Labelling
- Cartoning and packing
Labelling takes place after sealing and inspection, so only closed, accepted vials are labelled. For the sealing step, read our vial cap sealing machine working principle.
Why Vials Need Careful Labelling
| Vial Characteristic | Labelling Challenge |
|---|---|
| Small diameter | Labels must wrap a tight curve and can lift |
| Glass body | Must be handled without impacts or glass-to-glass contact |
| Light weight | Vials can tip or wobble on the conveyor |
| Aluminium seal and flip-off cap on top | Label must stay below the shoulder and neck |
| Cold or damp surfaces | Products stored cold or washed may have condensation |
| Small label area | Text, code and possibly a barcode must all fit and stay legible |
Main Components of a Vial Sticker Labeling Machine
- Infeed turntable or conveyor – receives vials from the inspection station.
- Spacing device – a separator wheel or feed screw that creates an even gap between vials.
- Side guides and support – keep vials upright and aligned.
- Label unwind reel – holds the label roll with controlled tension.
- Guide rollers – steer the label web.
- Label gap sensor – detects the gap between labels.
- Coding unit – prints batch number and dates on each label.
- Peel plate – separates the label from its liner.
- Drive roller (stepper or servo) – advances the label web.
- Liner rewind – collects the used backing.
- Product sensor – detects each vial and triggers dispensing.
- Wrap belt and pressure pad – rotate the vial to wrap the label around it.
- Pressing rollers or brushes – smooth the label.
- Label and code inspection sensors (optional) – confirm label presence and code.
- Outfeed turntable or conveyor – collects labelled vials.
- Control panel – speed, label length, position, counts and alarms.
Step-by-Step Working Principle
Step 1: Vial infeed
Sealed, inspected vials arrive at the labeller on a conveyor or are loaded onto an infeed turntable. The turntable gently guides them into a single line without allowing them to knock against each other.
Step 2: Spacing
A separator wheel or feed screw sets a precise gap between vials. This gap gives the label head time to dispense one label and prepare the next before the following vial arrives.
Step 3: Coding the label
As the label web passes the coding unit, the batch number, manufacturing date and expiry date are printed on the label, often just before the peel plate. Printing before dispensing keeps the code on a flat, stable surface for the sharpest result.
Step 4: Vial detection
As each vial passes the product sensor, the controller starts a short delay. The length of this delay determines where on the vial’s circumference the label begins.
Step 5: Label dispensing
At the end of the delay, the drive roller advances the web. The liner turns sharply around the peel plate and the label separates, its leading edge moving out into the path of the vial. The label is fed at the same speed as the vial surface so it lands smoothly.
Step 6: Wrap-around application
The leading edge touches the vial and sticks. The vial then passes between a moving wrap belt on one side and a pressure pad on the other. This makes the vial rotate as it moves forward, drawing the label off the peel plate and wrapping it around the body.
Because the vial is rotating against a soft pad, the label is pressed on along its full height as it wraps, pushing out air and preventing bubbles.
Step 7: Edge pressing
On small diameters, labels naturally try to spring back, especially at the trailing edge. Extra pressing, through continued rolling against the pad or additional rollers, makes sure both ends are firmly stuck.
Step 8: Inspection
Optional sensors check that each vial has a label and, depending on the system, that the code is present. Vials that fail can be stopped or rejected.
Step 9: Discharge
Labelled vials leave on the outfeed conveyor or collect on an outfeed turntable, ready for tray loading or cartoning.
Vial Labellers from Harsiddh
- Automatic Vial Sticker Labeling Machine
- Vial sticker labeling machine (vertical vial sticker labeller)
Browse the labeling machines for vials, our full range of labeling machines and the labeling machines on Harsiddh Engineering. If you also label ampoules, read our ampoule labeling machine working principle.
Designing Labels for Vials
The label is half of the labelling process. For vials:
- Material – thin, flexible paper or film conforms well to small diameters. Film labels resist moisture better, which helps for refrigerated products.
- Adhesive – must suit glass and the storage conditions. Products stored cold may need adhesives designed for low temperatures or condensation.
- Size – label height must sit between the vial base and shoulder. Length is usually chosen for a full wrap with a small overlap, or a partial wrap that leaves a viewing window to see the contents.
- Layout – a clear area for the variable code, and space for any barcode, which must remain readable after wrapping.
- Peel-off sections – some hospital vials use labels with a detachable part for patient records; these need careful design and testing.
Always test labels on actual vials under expected storage conditions.
Handling Vials Gently
- Smooth infeed and outfeed turntables prevent glass-to-glass impacts.
- The separator wheel or screw should be matched to the vial diameter.
- Wrap belt and pad pressure should be firm enough to rotate the vial but not so high that it stresses the glass or crimp.
- Guides should support the vial body, not the aluminium seal.
Inspection Before Labelling
Visual inspection for particles, cracks and seal defects normally happens before labelling. See the Semi-Automatic Visual Vial Inspection Machine, the visual ampoule and vial inspection machine and our inspection machines range.
Labelling Cold-Chain and Special Vials
Some injectable products need extra care at the labelling stage:
- Refrigerated products – vials taken from cold storage can form condensation when they warm up in the labelling room. Labels applied to a damp surface may not stick or may lift later. Allowing vials to reach a stable temperature, or using adhesives designed for cold and damp surfaces, helps.
- Freeze-dried (lyophilised) products – these vials are often slightly larger or have different shoulder shapes, so label height and head position need checking for each format.
- Coloured or amber glass – labels with high-contrast printing keep text legible against darker glass.
- Partial-wrap labels – a viewing window lets users check the contents, so the window must be positioned consistently on every vial.
Quality Checks on Labelled Vials
- Label presence on every vial
- Correct label for the product and strength
- Position – height and wrap within tolerance, no skew
- Adhesion – no lifted edges, bubbles or wrinkles
- Code – batch, manufacturing and expiry details present, correct and legible
- Barcode readability, where barcodes are used
Results should be recorded according to your batch documentation and quality procedures.
Key Settings and Their Effects
| Setting | What It Controls | Effect If Wrong |
|---|---|---|
| Separator spacing | Gap between vials | Labels bridging two vials |
| Label head height | Vertical label position | Label on shoulder or too low |
| Sensor delay | Start point on circumference | Overlap or window in the wrong place |
| Label speed | Matching vial surface speed | Wrinkles or stretched labels |
| Wrap belt speed and pressure | Rotation and adhesion | Skew, poor wrap, stress on glass |
| Pad pressure | Smoothing | Bubbles or flagging |
| Web tension | Straight label path | Skewed labels |
| Coder temperature or settings | Code quality | Faint, smudged or missing codes |
Troubleshooting Common Vial Labelling Problems
| Problem | Likely Cause | Corrective Action |
|---|---|---|
| Labels lifting at edges | Stiff label, low pad pressure, cold or damp vials | Use flexible label, increase pressure, ensure vials are dry |
| Skewed labels | Vial tilting, web tracking off | Adjust guides and wrap belt, check web path |
| Wrinkles | Label faster than vial surface | Match speeds |
| Bubbles | Insufficient pressing, damp surface | Adjust pad, dry vials |
| Label on shoulder | Head height wrong | Lower label head |
| Missing labels | Gap sensor or product sensor fault | Re-teach label, clean and align sensors |
| Faint codes | Coder settings, worn ribbon or foil | Adjust and service coder |
| Vials falling over | Poor spacing or guide setting | Adjust separator and guides |
Maintenance Tips
- Clean adhesive build-up from peel plate, rollers, belts and pad.
- Inspect wrap belts and pressure pads for wear.
- Check and clean all sensors.
- Service the coder and replace consumables on schedule.
- Keep change parts for each vial size labelled and stored together.
- Verify label position and code at every batch start.
Changeover Between Vial Sizes
Vials come in many sizes, so changeovers are frequent in multi-product plants. A typical changeover includes line clearance, changing the separator and guides, adjusting wrap belt position, loading the new label roll, teaching the label and setting head height and delay. For a detailed guide, read vial sticker labeling machine changeover: how to handle different vial diameters efficiently.
How to Choose a Vial Sticker Labeling Machine
- Vial sizes to be labelled
- Output to match the filling and sealing line
- Label type – full wrap, partial wrap, peel-off
- Coding method and code content
- Inspection for label presence and code
- Changeover speed and simplicity
- Integration with sealing, external washing and cartoning
- GMP documentation and qualification support
Frequently Asked Questions
What is the working principle of a vial sticker labeling machine? Vials are spaced on a conveyor, a sensor triggers a self-adhesive label to be peeled from its liner, and a wrap belt rotates each vial against a pressure pad so the label wraps around it and is pressed down.
Why are vials labelled after cap sealing? So that only sealed, inspected vials are labelled, and the label is not damaged by later processing.
How is the batch code applied? A coder prints batch and expiry details on the label, usually just before it is dispensed.
Why do labels lift on small vials? Small diameters make labels spring back. Flexible labels, suitable adhesive, dry vials and good pressing prevent lifting.
Can one labeller handle different vial sizes? Yes, within its range, using change parts and stored settings.
Looking for a reliable vial sticker labeling machine? Contact our team or send an inquiry with your vial sizes, label details and line speed.