
Meta description: Learn how to reduce vial sticker labeling machine changeover time when switching between vial diameters. Practical format-part, sensor, and SOP strategies from Harsiddh Unimach.
Pharmaceutical manufacturers rarely run just one vial size. A single production facility might package a 2 ml antibiotic vial in the morning and a 30 ml multi-dose vial by afternoon. Every time the vial diameter changes, the vial sticker labeling machine has to be reset — starwheels, guide rails, label sensors, and wrap-around parameters all need adjustment. If that changeover isn’t engineered properly, it can eat hours out of your shift, invite labeling defects, and quietly erode your line’s real output.
This guide breaks down exactly where changeover time gets lost when handling different vial diameters, and the practical steps — mechanical, procedural, and technological — that pharmaceutical plants use to bring that time down without compromising label placement accuracy or GMP compliance.
Why Vial Diameter Changes Are the Hardest Part of Labeling Changeover
Unlike a simple label reel swap, a diameter change affects nearly every station on a labeling line simultaneously:
- Starwheel and infeed screw pitch must match the new vial’s outer diameter so vials are spaced correctly before they reach the labeling head.
- Guide rails and vial-holding platforms need to be repositioned or swapped so the vial sits centered under the applicator.
- Wrap-around length and label sensor position shift because a change in diameter changes the circumference the label must travel around.
- Centering and pressure-roller settings on the labeling head need recalibration, since a thinner vial needs less compression than a wider one.
Because these adjustments are interdependent, an operator who changes only the guide rails but forgets to update the wrap-around parameter will get labels that are either too loose or overlap incorrectly — a rejection waiting to happen. This is precisely why diameter changeover, more than reel changes or ribbon changes, is where most labeling downtime actually accumulates.
Step 1: Map Every Adjustment Point Before You Touch the Machine
Before changeover even begins, the team should have a documented list of every point on the sticker labeling machine that changes with vial diameter. Most plants organize this as a format parts matrix — a simple table listing each vial SKU against its corresponding:
- Starwheel size
- Guide rail height and gap setting
- Vial platform height
- Label wrap length and sensor trigger point
- Pressure roller gap
When this matrix exists as a physical or digital reference, operators stop guessing and start executing a checklist. This alone can cut changeover variability between shifts and operators significantly, because the “tribal knowledge” of a senior technician is captured and made repeatable.
Step 2: Standardize Format Parts with Quick-Release Fittings
The single biggest mechanical lever for faster diameter changeovers is how the format parts — starwheels, guide rails, and vial platforms — attach to the machine frame.
Machines that rely on multiple bolts, washers, and manual alignment for every format part swap will always be slower than machines designed with quick-release or tool-less locking mechanisms. Look for or specify:
- Quick-change starwheels that slide onto a keyed shaft and lock with a single knob or lever, rather than a multi-bolt flange.
- Pre-set guide rail brackets with numbered index marks corresponding to each vial diameter, so operators aren’t measuring gaps with a caliper every time.
- Cassette-style vial platforms that can be swapped as a single unit instead of adjusted piece by piece.
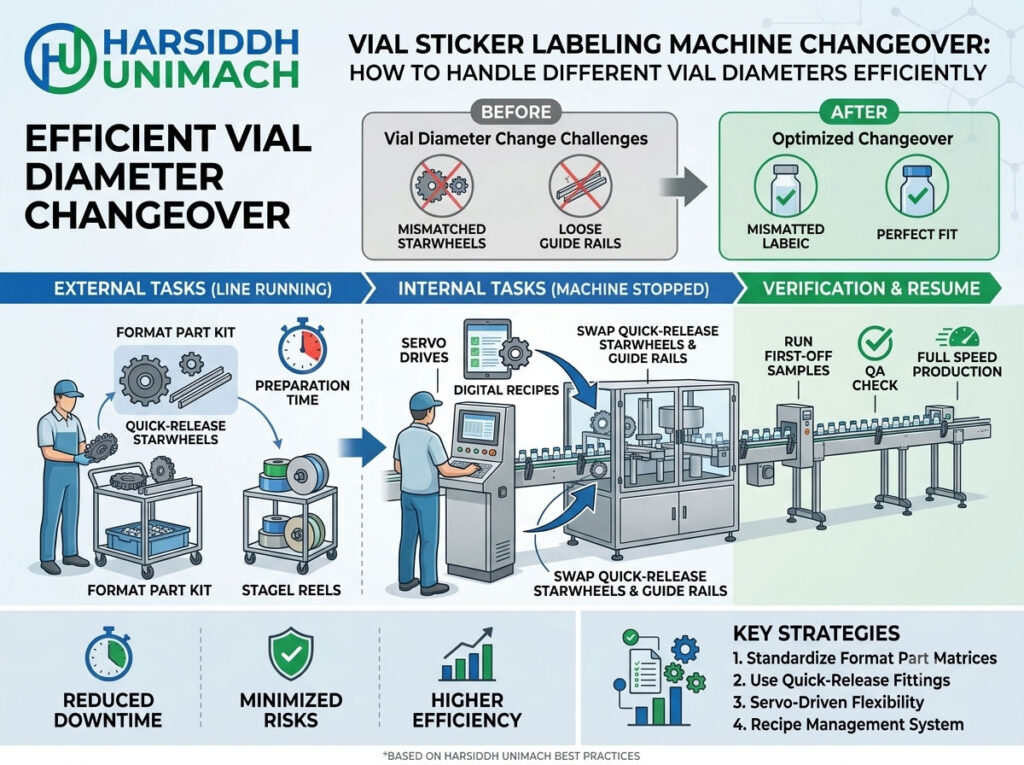
This is essentially the pharmaceutical packaging version of SMED (Single-Minute Exchange of Die) — a lean manufacturing method built around converting “internal” changeover steps (which require the machine to be stopped) into “external” steps that can be prepared in advance while the line is still running the previous batch. Pre-staging the next format part set on a labeled cart next to the line, fully assembled and ready to drop in, is often the single highest-impact change a plant can make.
Step 3: Separate Internal and External Changeover Tasks
Applying SMED thinking specifically to vial diameter changeover means asking, for every task, “does the machine have to be stopped for this?”
External tasks (do these while the line is still running the previous SKU):
- Retrieve and pre-assemble the format part kit for the next vial diameter
- Pre-load the correct label reel and verify label artwork against the batch record
- Stage cleaning materials and changeover tools at the line
Internal tasks (these require the machine stopped):
- Physically swap starwheels, guide rails, and platforms
- Recalibrate label sensor position and wrap-around length
- Run and inspect first-off samples
By rigorously keeping external tasks off the machine’s downtime clock, plants routinely find they can cut apparent changeover time by 30–40% without buying new equipment — simply by reorganizing when work happens.
Step 4: Use Servo-Driven Label Placement for Diameter Flexibility
Older labeling heads rely on mechanical cams and fixed-ratio gearing, which means a diameter change often requires swapping physical cams or gear sets — a slow, tool-heavy job. Modern labeling machines built around servo motors and touchscreen HMIs handle this differently: the wrap length, label placement start point, and roller pressure are stored as digital recipes.
With a servo-driven system, switching from a 20 mm vial to a 30 mm vial can be as simple as:
- Selecting the stored recipe for the new vial diameter on the HMI
- Swapping the mechanical format parts (starwheel, guide rails) that still need physical adjustment
- Running a short verification cycle to confirm label placement before full production resumes
This doesn’t eliminate mechanical changeover entirely — vial diameter still requires physically different guide rails and starwheels — but it removes the manual recalculation and fine-tuning of wrap length and sensor timing that used to take up a large share of changeover time.
Step 5: Build a Recipe Management System
Once a machine supports digital parameter storage, the next step is disciplined recipe management. Every SKU — meaning every combination of vial diameter, label type, and wrap style — should have a saved recipe that includes:
- Vial diameter and height
- Starwheel and guide rail identifiers
- Label wrap length and applicator delay
- Pressure roller settings
- Approved label artwork reference and batch record link
When recipes are locked and version-controlled, changeover becomes selecting a validated recipe rather than an operator re-deriving settings from memory. This also directly supports data integrity and audit readiness, since inspectors can see exactly which validated parameter set was used for each batch.
Step 6: Train Operators on Diameter-Specific Failure Modes
Even with better hardware and digital recipes, operator judgment still matters. Training should specifically cover what a diameter mismatch looks like in practice, since it often shows up differently depending on which direction the mismatch runs:
- Guide rails set too wide for the vial: vials wobble as they pass under the applicator, causing skewed or crooked labels.
- Guide rails set too narrow: vials jam or scuff against the rail, sometimes causing glass chips on that shift’s most fragile SKUs.
- Wrap length not updated for a larger diameter: the label doesn’t fully close, leaving a gap or exposed adhesive edge.
- Wrap length not updated for a smaller diameter: the label overlaps excessively, creating a raised seam that can jam downstream inspection or cartoning equipment.
Teaching operators to recognize these signatures means problems get caught and corrected in the first few vials of a run, not after a few hundred units have already been mislabeled.
Step 7: Track Changeover Time as a Metric, Not an Assumption
Many plants assume they know how long a diameter changeover takes, but few actually time it consistently. A simple practice — logging the start time (last good vial of the previous SKU) and end time (first approved vial of the new SKU) for every changeover — reveals patterns that guesswork misses: which SKU combinations are slowest, which shifts are fastest, and where bottlenecks repeat.
This data becomes the foundation for continuous improvement. If changeovers from small-diameter to large-diameter vials consistently take longer than the reverse, that’s a specific, fixable process step — not a vague “changeover is slow” complaint.
Common Mistakes That Slow Diameter Changeovers Down
Even plants that have invested in good equipment sometimes undercut their own changeover speed with process habits that are easy to overlook:
- Storing format parts loosely in a bin instead of a labeled, dedicated rack. Operators lose several minutes just locating the correct starwheel or guide rail size, and mismatched parts occasionally get grabbed by mistake.
- Relying on a single trained technician for changeovers. When that person is on leave, changeover time on other shifts can double or triple because no one else has memorized the fine adjustments.
- Skipping the verification run to save time. A rushed changeover that skips first-off inspection often costs far more time later, once a batch of mislabeled vials has to be identified, quarantined, and reworked.
- Not cleaning label sensors between changeovers. Adhesive residue or dust buildup on optical sensors can cause misreads that look like a settings problem, sending operators chasing the wrong fix.
- Failing to update the batch record in real time. When changeover data is filled in after the fact from memory, the record becomes unreliable for future process improvement and audit purposes.
Addressing these habits costs little to nothing in capital investment, yet they are frequently responsible for a large share of the “extra” time added on top of the mechanically necessary changeover steps.
How Diameter Range Affects Machine Selection
If your product portfolio spans a wide diameter range — say, from a 10 ml vial up to a 100 ml vial — it’s worth evaluating this at the machine specification stage, not just the operational stage. Some labeling heads are mechanically optimized for a narrow diameter band and require extensive rework (not just format part swaps) to handle vials at the extreme ends of a wide range.
When specifying a new vial sticker labeling machine, it helps to share your complete SKU list — including the smallest and largest vial diameters you run — with the machine builder up front. This allows the applicator head, sensor range, and drive system to be selected for the full span of your production needs, rather than being retrofitted later when a new product falls outside the original design window.
Bringing It Together: A Sample Changeover Workflow
A well-engineered diameter changeover, incorporating the steps above, typically looks like this:
- Before line stop: Pre-stage the next format part kit and label reel; confirm the digital recipe for the new SKU is validated and available.
- Line stop: Swap starwheel, guide rails, and vial platform using quick-release fittings; load the saved recipe on the HMI.
- Verification run: Run a small batch of vials through the labeling machine and visually inspect wrap closure, label centering, and adhesion.
- Sign-off: Record changeover start/end time and QA verification in the batch record.
- Resume production at full line speed.
Plants that formalize this workflow — rather than leaving it to individual operator experience — typically see the most consistent, repeatable changeover times across shifts.
Related Reading and Machinery
If diameter changeover is a recurring challenge on your line, these related resources may help:
- Front and Back Sticker Labeling Machine: How to Achieve Precise Dual-Side Label Placement
- Automatic Front and Back Sticker Labeling Machine Buying Guide for Pharma Manufacturers
- High-Speed Labeling Machine Maintenance: Components That Require Regular Inspection
- Common Labeling Mistakes and How to Avoid Them
- Vial Filling Machine Changeover: Best Practices for Format Changes
- Vial Filling Machine Spare Parts Inventory: Essential Components to Keep in Stock
And explore our related machine categories:
Conclusion
Handling different vial diameters efficiently isn’t about buying a completely new machine every time your product mix changes — it’s about engineering the changeover process itself: standardized format part matrices, quick-release mechanical fittings, servo-driven digital recipes, and disciplined operator training. Plants that treat changeover as a process to be measured and improved, rather than an unavoidable delay, consistently run faster, cleaner changeovers and protect their labeling accuracy across every SKU in their portfolio.
At Harsiddh Unimach Pvt. Ltd., we design vial sticker labeling machines with format flexibility built in from the ground up — quick-release format parts, servo-controlled wrap placement, and recipe management designed for pharmaceutical GMP environments. To discuss a labeling line built around your specific vial range, reach out to us at info@harsiddhunimach.com or visit www.harsiddhunimach.com.