
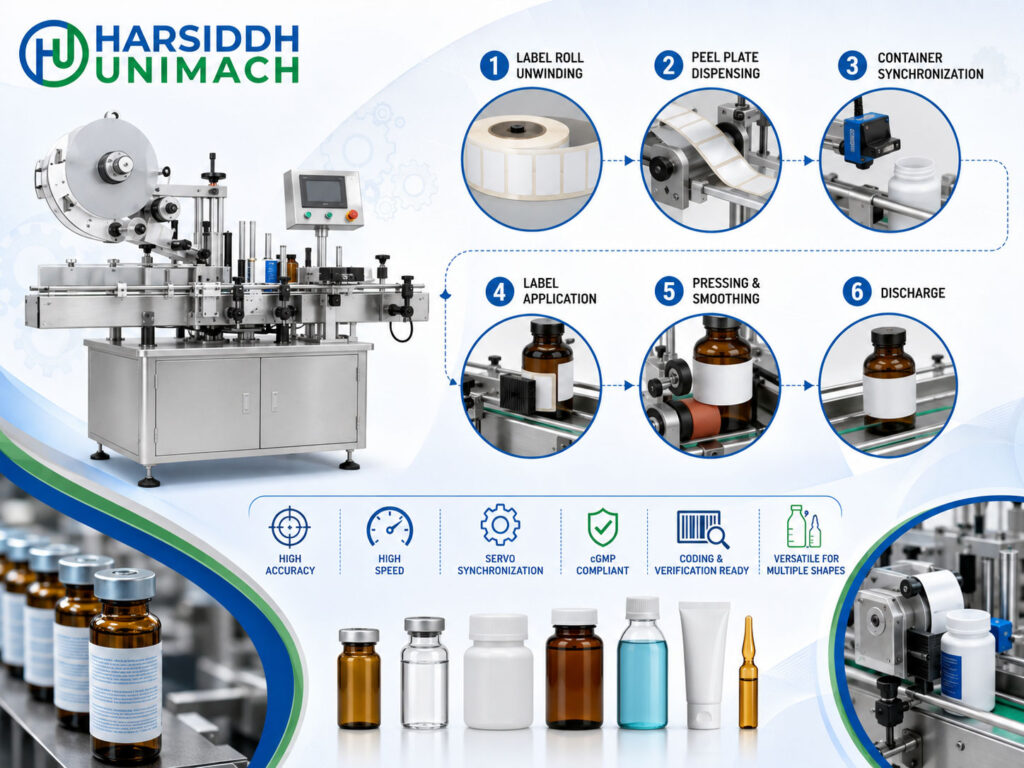
Look at almost any packaged product, a bottle of syrup, a vial of injection, a jar of cream, a carton of tablets, and you will find a sticker label. The label carries the brand, the product name, the dosage, batch and expiry information and any regulatory text. In pharmaceuticals, it is part of the product itself: a missing, crooked or wrong label can mean a rejected batch or a recall.
Most of these labels are self-adhesive (also called pressure-sensitive) labels, and they are applied by a sticker labeling machine. Whether the machine is labelling ampoules, round bottles, flat bottles or cartons, the core working principle is the same: peel a label from its backing at exactly the right moment and press it onto a moving product at exactly the right place.
In this article, we explain that principle in detail: how self-adhesive labels are built, how the label web travels through the machine, how labels are detected, dispensed and applied, and how different machine types adapt the principle for different containers. We also cover settings, common faults and how to choose a machine.
How a Self-Adhesive Label Is Made
Understanding the label roll makes the machine much easier to understand. A self-adhesive label roll has three layers:
- Face material – paper or film (such as PP, PE or PET), printed with the label design.
- Adhesive – a pressure-sensitive adhesive on the back of the face material. It sticks when pressed, without heat or water.
- Liner (backing paper) – a silicone-coated paper or film that holds the labels until they are used. The silicone lets the labels peel off cleanly.
Labels are die-cut on the liner with small gaps between them. The machine uses these gaps to detect where each label starts and stops. After the labels are dispensed, the empty liner is rewound and discarded.
The Core Working Principle
Every sticker labeling machine performs four actions for each product:
- Detect the product – a sensor tells the machine a product is in position or approaching.
- Advance the label web – the drive pulls the label strip forward.
- Peel the label – the liner is pulled sharply around a peel plate, so the stiffer label separates and sticks out ahead.
- Apply the label – the protruding label touches the moving product, and rollers, belts or brushes press it down firmly.
The key requirement is synchronisation: the label must leave the peel plate at the same speed as the product surface is moving, and at the right instant, so it lands in the correct position without wrinkles or bubbles.
Main Components of a Sticker Labeling Machine
- Label unwind (supply reel) – holds the label roll, with a brake or dancer arm to control tension.
- Guide rollers – steer the label web along its path.
- Drive roller – a stepper or servo motor pulls the liner, advancing the labels.
- Label gap sensor – detects the gap between labels so the machine stops each label at the same position.
- Peel plate (dispensing edge) – a sharp edge around which the liner turns, separating the label.
- Liner rewind – collects the used backing paper.
- Product conveyor – carries products through the labelling station at a constant speed.
- Product sensor – detects each product and triggers the label dispense.
- Product spacing device – a separator wheel or screw that creates even gaps between products.
- Application system – rollers, wrap belts, brushes or sponge pads that press the label onto the product.
- Product guides or top hold-down belt – keep products upright and stable during labelling.
- Coding unit (optional) – a hot-stamp, thermal transfer or inkjet coder that prints batch and expiry details on the label.
- Control panel – sets label length, speed, dispense position and counts.
Step-by-Step: How a Sticker Labeling Machine Works
Step 1: Loading the label roll
The operator mounts the label roll on the unwind reel and threads the web through the guide rollers, past the gap sensor, around the peel plate, through the drive roller and onto the rewind reel. Correct threading is essential: a web running off-centre or with the wrong tension causes misplaced labels.
Step 2: Teaching the label
At set-up, the machine “learns” the label. It advances the web while the gap sensor measures the label length and gap. From then on, every time it dispenses a label, it stops the web exactly as the next label edge reaches the peel plate, ready for the next product.
Step 3: Product infeed and spacing
Products arrive on the conveyor. A separator wheel or screw spaces them evenly, so there is always enough room to apply one label before the next product arrives.
Step 4: Product detection
As each product passes the product sensor, the controller starts a short, adjustable delay. This delay determines where on the product the label will land.
Step 5: Dispensing
At the end of the delay, the drive motor advances the web. The liner bends sharply around the peel plate, and because the label is stiffer than the liner’s bend radius, it separates and moves forward into the path of the product.
For good results, the label dispense speed is matched to the conveyor speed. If the label moves faster than the product, it bunches and wrinkles; if slower, it stretches or skews. Servo and stepper drives allow precise speed matching.
Step 6: Application
The leading edge of the label touches the product and sticks. As the product continues moving, the rest of the label is drawn off the peel plate and pressed on by the application system:
- Round containers – a wrap belt or roller rotates the container so the label wraps smoothly around it.
- Flat or square containers – rollers or brushes press the label flat against one face.
- Top surfaces – a pressing roller or sponge applies labels to the top of cartons, jars or pouches.
Step 7: Coding and inspection (optional)
A coder may print the batch number, manufacturing and expiry dates on the label just before it is dispensed. Sensors or vision systems can confirm that each product has a label and that the code is present and readable.
Step 8: Discharge
The labelled product leaves the machine on the outfeed conveyor for cartoning or packing. The drive has already stopped the next label at the peel plate, ready for the next product.
Types of Sticker Labeling Machines
The core principle stays the same; what changes is how the product is handled and how the label is pressed on.
Round bottle wrap-around labellers
Bottles stand upright on the conveyor and are rotated by a wrap belt or rollers as the label is applied. This is the most common type for syrups, tonics and oral liquids. See the Automatic Round Bottle Sticker Labeling Machine, the bottle sticker labeling machine and the vertical bottle sticker labeling machine. For more detail, read our bottle labeling machine working principle.
Vial labellers
Small vials need gentle handling and precise placement on a small diameter. See the Automatic Vial Sticker Labeling Machine and read our vial sticker labeling machine working principle. Browse the labeling machines for vials.
Ampoule labellers
Ampoules are small, fragile and often labelled lying horizontally while rolling. See the horizontal ampoule sticker labelling machine and the labeling machines for ampoules.
Flat bottle and front-and-back labellers
Flat and oval bottles receive labels on one or both faces using pressing rollers or belts. See the double side flat bottle sticker labeling machine and the labeling machines for flat bottles.
Rotary sticker labellers
Containers are carried on a rotating turret with individual platforms, allowing high output and precise orientation. Read our rotary sticker labeling machine working principle.
Top and side labellers
Labels are applied to the top or side of cartons, jars, tins and pouches. See the Automatic Top Side Sticker Labeling Machine and the Automatic Carton Box Sticker Labeling Machine.
Browse the full range of labeling machines, the labeling machines on Harsiddh Engineering and the labeling machines for round bottles.
Stepper vs Servo Label Drives
| Feature | Stepper Drive | Servo Drive |
|---|---|---|
| Positioning | Good, open loop | Very precise, closed loop |
| Speed range | Low to medium | Medium to high |
| Acceleration | Moderate | Fast and smooth |
| Typical use | Standard labellers | High-speed and precision labellers |
| Cost | Lower | Higher |
Both are widely used. For high-speed lines and very small labels, servo drives give better consistency.
Key Settings and Their Effects
| Setting | What It Controls | Effect If Wrong |
|---|---|---|
| Label length (taught) | Where each label stops | Labels stopping early or late, double labels |
| Gap sensor sensitivity | Detecting the label gap | Missed gaps, runaway web |
| Product sensor delay | Label position on product | Labels too high, low, left or right |
| Label dispense speed | Matching product speed | Wrinkles or stretched labels |
| Conveyor speed | Product movement | Mismatch with label speed |
| Web tension | Smooth, straight label path | Skewed labels, web breaks |
| Peel plate angle and position | Clean label release | Labels not peeling or curling |
| Wrap belt or roller pressure | Adhesion and smoothness | Bubbles, flags, loose edges |
| Product spacing | Room for each label | Labels bridging two products |
Troubleshooting Common Labelling Problems
| Problem | Likely Cause | Corrective Action |
|---|---|---|
| Wrinkled labels | Label speed faster than product | Match speeds, adjust wrap pressure |
| Skewed (crooked) labels | Web tracking, product tilting | Adjust guides, check web path and product stability |
| Bubbles under labels | Uneven pressing, dirty or wet container | Adjust rollers or brushes, ensure containers are clean and dry |
| Flagging (label edge lifting) | Low pressure, label too stiff for diameter, poor adhesive match | Increase pressure, review label material |
| Labels not dispensing | Gap sensor not detecting, web broken | Re-teach sensor, re-thread web |
| Double labels | Gap missed | Re-teach label, check sensor |
| Label position varies | Inconsistent product spacing, sensor misaligned | Adjust spacing device, align sensor |
| Labels not sticking | Product surface damp, oily or too cold | Clean and dry containers, check label adhesive |
Many labelling problems start upstream: wet bottle surfaces from filling, product on the outside of the container or poor closure fit. Our article on the top 10 labeling mistakes manufacturers should avoid covers these in detail.
Maintenance Tips
- Clean adhesive build-up from the peel plate, rollers and guides regularly.
- Check the gap and product sensors for dust and alignment.
- Inspect drive and pressure rollers for wear and glazing.
- Check the unwind brake and dancer arm for correct tension.
- Keep wrap belts and brushes clean and in good condition.
- Verify coder settings and print quality at each batch start.
How to Choose a Sticker Labeling Machine
- Container types – round, flat, square, vials, ampoules, cartons
- Label positions – wrap-around, front, back, top, side
- Label sizes and materials
- Output and line speed
- Drive type – stepper or servo
- Coding and inspection needs
- Changeover frequency between containers and labels
- Integration with fillers, cappers and cartoners
Frequently Asked Questions
What is the working principle of a sticker labeling machine? The machine detects each product, advances a self-adhesive label web, peels the label off its liner over a peel plate and presses it onto the moving product with rollers, belts or brushes.
How does the machine know where each label starts? A gap sensor detects the small gaps between die-cut labels on the liner, so the web stops at the same point after each label.
Why do labels wrinkle? Usually because the label is dispensed faster than the product is moving, or because pressing is uneven.
What is the difference between stepper and servo labellers? Servo drives use closed-loop feedback for higher speed and precision; stepper drives are simpler and suit standard applications.
Can one machine label different containers? Many machines handle a range of sizes within one container type with change parts. Different container types, such as round and flat bottles, usually need different application systems.
Looking for the right sticker labeling machine? Contact our team or send an inquiry with your container, label and output details.