
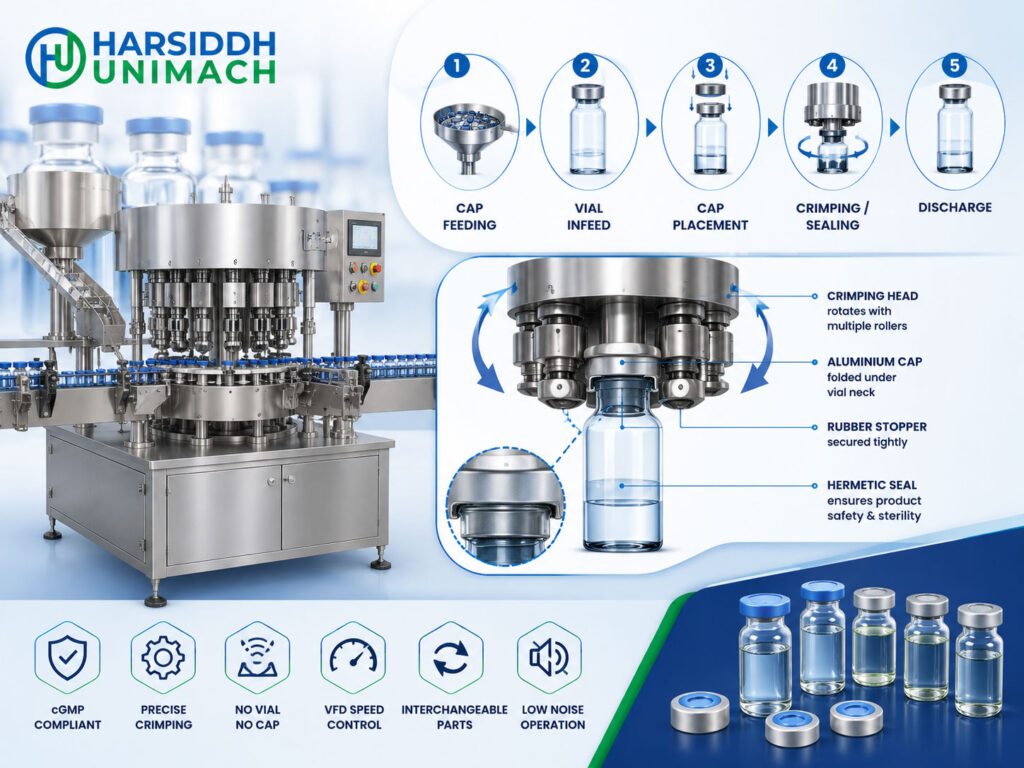
Every injectable vial goes through the same final closure step: an aluminium seal is placed over the rubber stopper and crimped tightly around the vial neck. This crimp holds the stopper firmly in place, protects the sterility of the product throughout its shelf life and provides clear evidence of tampering. Without it, the stopper alone could loosen during transport, temperature changes or handling.
The machine that performs this step is the vial cap sealing machine, also called a vial capping or crimping machine. Whether it is a compact semi-automatic unit in an R&D lab or an eight head rotary machine on a high-speed line, the principle is the same: press the seal down and fold its skirt under the vial neck flange with rollers.
This guide explains the working principle of vial cap sealing machines, the types of seals used, the main machine designs, the step-by-step sealing process, the settings that determine crimp quality and how to troubleshoot common problems. It also links to our detailed guides on specific machine types.
Why Vials Need a Crimped Seal
After filling, vials are closed with a rubber stopper. The stopper seals the vial, but on its own it can be pushed out by internal pressure, temperature changes or rough handling. The aluminium seal:
- Locks the stopper in place with a controlled compressive force
- Maintains container closure integrity throughout shelf life
- Provides tamper evidence — a removed or damaged seal shows the vial has been opened
- Protects the stopper surface until use, especially with flip-off caps
- Allows colour coding of products through different cap colours
Because the stopper must be correctly seated before capping, the filling and stoppering step directly affects capping quality. See how stopper placement affects container closure quality.
Types of Vial Seals
Plain aluminium seals
A simple aluminium cap with a central opening or tear-away section. Economical and widely used.
Flip-off seals
An aluminium seal with a plastic cap on top. The user flips off the plastic cap to expose the stopper for needle insertion. Flip-off seals are the most common choice for injectable vials and allow colour coding.
Tear-off seals
Designed to be removed completely by pulling a tab — often used where the stopper must be removed entirely.
All these seals are crimped using the same basic principle, although change parts and settings are matched to the seal size and design.
The Core Working Principle
A vial cap sealing machine works in three essential stages:
- Seal placement — an aluminium seal is placed loosely over the stopper
- Top pressure — a spring-loaded plunger presses the seal and stopper down onto the vial lip
- Roller crimping — rollers move inward and travel around the vial neck, folding the aluminium skirt under the neck flange to form a tight, permanent seal
The result is a smooth aluminium band that holds the stopper under compression.
Step-by-Step Sealing Process
Step 1: Vial infeed
Stoppered vials arrive from the filling and stoppering machine — such as our liquid vial filling machine with rubber stoppering or, for sterile powders, the injectable dry powder vial filling with rubber stoppering machine (single wheel). On automatic machines, an infeed conveyor and star wheel (sometimes with an infeed worm) space and position the vials.
Step 2: Seal feeding
Aluminium seals are loaded into a vibratory bowl, which orients them and sends them down a chute. A sensor controls the chute level.
Step 3: Seal pick-off
As each vial passes the end of the chute, its stopper catches a seal and carries it away, so the seal sits loosely on top. On semi-automatic machines, the operator may place the seal by hand.
Step 4: Positioning under the sealing head
The vial is positioned beneath a sealing head — either one head on single head machines or one of several heads on a rotary turret.
Step 5: Plunger pressure
The head descends and a spring-loaded plunger presses the seal down, compressing the stopper slightly against the vial lip.
Step 6: Crimping
Crimping rollers move inward against the bottom of the seal skirt. As the head spins (or the rollers orbit the vial), the rollers travel around the neck, progressively folding the aluminium under the flange.
Step 7: Release and discharge
The rollers retract, the head lifts and the sealed vial is discharged to the outfeed conveyor.
For a closer look at the full fill-to-seal sequence, read understanding the complete vial filling and stoppering process.
Types of Vial Cap Sealing Machines
Semi-automatic vial cap sealing machines
The operator places each vial (and sometimes each seal) under the sealing head and starts the cycle. Ideal for R&D, pilot batches and very small production. See the Semi-Automatic Vial Cap Sealing Machine.
Automatic single head machines
Vials are fed automatically and sealed one at a time by a single head. Suitable for small production volumes. See the Automatic Single Head Vial Cap Sealing Machine.
Automatic multi-head rotary machines
Several heads — typically four, six or eight — are mounted on a continuously rotating turret. Each head seals a vial as the turret turns, delivering higher output with consistent crimps.
- Four head machines suit small to medium production. Read the complete guide to the four head vial cap sealing machine working principle.
- Six head machines offer higher output — see the Automatic Six Head Vial Cap Sealing Machine.
- Eight head machines serve high-speed lines. Read the eight head vial cap sealing machine working principle.
See our full range of 1, 4, 6 and 8 head vial cap sealing machines, and compare options in eight head vs single head vial cap sealing machine.
Comparison of Machine Types
| Type | Output | Vial Feeding | Best For |
|---|---|---|---|
| Semi-automatic | Low | Manual | R&D, pilot batches |
| Automatic single head | Low to medium | Automatic | Small production |
| Four head rotary | Medium | Automatic | Small to medium production |
| Six head rotary | Medium to high | Automatic | Larger production |
| Eight head rotary | High | Automatic | High-speed lines |
The Physics of a Good Crimp
A good crimp depends on the balance of two forces:
- Top pressure from the plunger compresses the stopper. Too little leaves the stopper loose; too much over-compresses it and can stress the glass.
- Side pressure from the rollers forms the aluminium. Too little leaves the skirt loose; too much can crack the vial neck or tear the aluminium.
Roller profile and height are equally important. The roller must form the skirt just below the neck flange — too high and the crimp lacks grip; too low and the roller may hit the glass.
Key Settings and Their Effects
| Setting | Too Low | Too High |
|---|---|---|
| Plunger pressure | Stopper not compressed, loose seal | Over-compressed stopper, glass stress |
| Roller pressure | Loose skirt, seal rotates | Cracked neck, torn seal |
| Roller height | Weak grip | Roller contacts glass |
| Head height | Insufficient top pressure | Excessive force on vial |
| Machine speed | Low output | Incomplete or uneven crimps |
| Seal feeder vibration | Missing seals | Jams and damaged seals |
Checking Crimp Quality
- Visual inspection — smooth, even crimp; no wrinkles, pleats, tears or tilted seals; flip-off cap intact
- Seal tightness — the seal should not rotate when tested by the approved method
- Neck inspection — no cracks or chips
- Residual seal force testing — some facilities measure the remaining compression on the stopper using specialised instruments
- Container closure integrity testing — performed during validation to confirm the closure protects the product
For powder vials, dedicated inspection such as our visual vial dry powder inspection machine checks the sealed product before labelling.
Where Capping Fits in the Vial Line
- Vial washing
- Depyrogenation
- Filling and stoppering
- Cap sealing
- External washing — on an automatic external vial washing machine
- Inspection
- Labelling — using labeling machines for vials
- Packing
For powder lines, filling and stoppering equipment from our range of injectable powder filling machines feeds the capper in the same way.
Troubleshooting Common Problems
| Problem | Likely Cause | Corrective Action |
|---|---|---|
| Loose or rotating seals | Low roller or plunger pressure, worn rollers | Increase pressure, replace rollers |
| Wrinkled or pleated skirts | Wrong roller height or profile, excessive speed | Adjust height, check rollers, reduce speed |
| Cracked vial necks | Excessive pressure, misalignment | Reduce pressure, realign head |
| Missing seals | Empty chute, feeder or pick-off issues | Refill bowl, adjust pick-off |
| Tilted seals | Seal not centred at pick-off, raised stopper | Adjust pick-off, check stoppering |
| Torn seals | Poor seal quality, excessive force | Check seal supplier, reduce pressure |
| Aluminium dust | Worn rollers, poor-quality seals | Replace rollers, review seals |
Changeover Between Vial and Seal Sizes
Vials range from small 2 ml formats to large infusion vials, and seals come in matching diameters. When switching formats:
- Clear all vials and seals from the machine and complete line clearance
- Change star wheels, guides, infeed worm (if fitted) and seal chute for the new size
- Adjust head height so the plunger contacts the seal correctly
- Set roller height and pressure for the new neck and seal
- Retune the seal feeder for the new seal size
- Run trial vials and check crimp quality — head by head on multi-head machines
- Record settings and obtain approval before production
Labelled change parts and recorded settings for each format make changeovers faster and results more repeatable.
Capping and GMP
In pharmaceutical production, capping is part of the validated process. Expect to define and document crimp settings, perform in-process crimp checks, control seal materials and colours against the batch record, reconcile seals at the end of each batch and keep qualification records for the machine.
Maintenance Essentials
- Daily: remove aluminium dust from heads, rollers, turret and conveyors; check guards and sensors
- Regularly: inspect rollers, plungers and springs; replace worn parts — on multi-head machines, as matched sets
- Periodically: check drives, bearings, cam tracks and gearboxes; lubricate as specified
- Change parts: keep star wheels, guides and chutes for each vial and seal size clean, labelled and in good condition
How to Choose a Vial Cap Sealing Machine
- Required output — match or slightly exceed your filler’s speed
- Vial and seal sizes — confirm change parts for all formats
- Seal types — plain, flip-off or tear-off
- Automation level — semi-automatic, single head or multi-head rotary
- Line integration — conveyor height, speed matching and controls
- GMP construction and documentation
- Service and spare parts support
Explore our capping machines, the full range of glass vial capping machines and all capping machines on Harsiddh Engineering.
Frequently Asked Questions
What is the working principle of a vial cap sealing machine? An aluminium seal is placed over the stopper, a plunger presses it down, and rollers fold the seal skirt under the vial neck flange to form a secure crimp.
What is a flip-off seal? An aluminium seal with a plastic cap that the user flips off to access the stopper. It is the most common closure for injectable vials.
Why do vials need a crimped seal if they already have a stopper? The crimp locks the stopper in place, maintains container closure integrity and provides tamper evidence.
What causes cracked vials during sealing? Usually excessive roller or plunger pressure, incorrect roller height or misalignment between head and vial.
Which machine type should I choose? Semi-automatic or single head machines suit small batches; four, six and eight head rotary machines suit progressively higher outputs.
Looking for the right vial cap sealing machine? Contact our team or send an inquiry to discuss your vials, seals and output.