
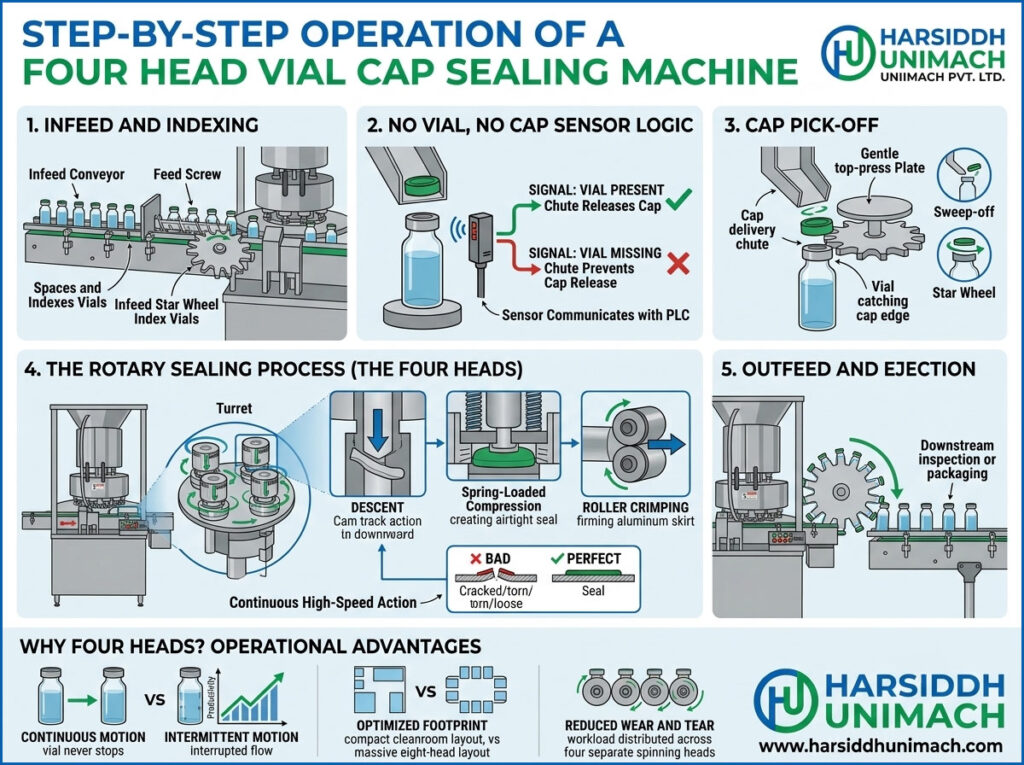
A four head vial cap sealing machine performs one of the last critical steps in injectable production: placing an aluminium seal over the rubber stopper and crimping it securely around the vial neck. A good crimp holds the stopper firmly in place, protects container closure integrity and provides tamper evidence. A poor crimp — loose, wrinkled or over-tight — can lead to leaks, cracked vials, rejected batches and customer complaints.
The machine itself is robust and straightforward, but consistent results depend on correct operation. This guide walks operators, supervisors and new users through the complete operating sequence, step by step: preparation, setup, start-up, running, in-process checks, changeover, shutdown and cleaning, followed by a troubleshooting guide.
If you want to understand the mechanisms inside the machine first, read our companion article: automatic four head vial cap sealing machine working principle — the complete guide.
Note: this guide describes typical practice. Always follow your machine’s operating manual and your site’s approved SOPs.
Quick Overview: What the Machine Does
In a typical four head rotary design:
- Stoppered vials arrive on the infeed conveyor from the filling and stoppering machine.
- An infeed star wheel separates and positions the vials.
- As each vial passes the cap chute, it picks up an aluminium seal from the chute’s pick-off point.
- The vial enters the rotating turret, where one of four sealing heads descends onto it.
- A spring-loaded plunger holds the seal down while sealing rollers spin around the vial and crimp the seal skirt under the vial neck flange.
- The head lifts and the sealed vial exits via the outfeed star wheel to the conveyor.
Four heads work in sequence on the turret, allowing continuous operation at a higher speed than single head machines. See the Automatic Four Head Vial Cap Sealing Machine and our range of 1, 4, 6 and 8 head vial cap sealing machines.
Step 1: Pre-Start Preparation
Before switching on the machine, complete these checks:
Documentation
- Confirm the batch record, product name, vial size and seal type
- Check that line clearance from the previous batch has been completed and recorded
- Verify the machine status label shows it is clean and ready for use
Materials
- Confirm the correct aluminium seals (diameter, colour, flip-off cap type) have been issued and match the batch record
- Check seals for damage, deformation or contamination
- Ensure stoppered vials from the filling machine are available
Machine condition
- Verify that the correct change parts are fitted for the vial size: star wheels, guides, cap chute and sealing heads
- Check that guards and covers are in place and safety interlocks are working
- Inspect sealing rollers for wear or damage
- Make sure the area around the machine is clean and free of loose items
Utilities
- Confirm electrical supply is available and the main switch is functioning
- If the machine uses compressed air for any functions, verify pressure is within range
Step 2: Machine Setup
Fitting change parts
If the vial or seal size differs from the previous batch, fit the correct parts:
- Infeed and outfeed star wheels to match vial diameter
- Side guides along the conveyor
- Cap chute and pick-off to match seal diameter
- Sealing heads, including plungers and roller settings, for the vial neck and seal size
Tighten all fixings and check that parts are clearly identified.
Height adjustment
Adjust the sealing head or turret height so that the plunger contacts the seal correctly when the vial is in position. Many machines have a handwheel or motorised height adjustment with a scale for repeatable settings.
Roller adjustment
Set the sealing rollers so they crimp the seal skirt just under the vial neck flange. Roller position and pressure are critical:
- Too little pressure leaves the seal loose, so it can rotate or lift.
- Too much pressure can crack the vial neck, deform the stopper or tear the seal.
Learn more about why this matters in how crimping force affects container closure integrity.
Cap feeding
Load seals into the vibratory bowl or hopper. Adjust bowl vibration so seals move steadily up the track into the chute without jamming. Check that seals arrive at the pick-off point correctly oriented.
Step 3: Start-Up and Trial Run
- Switch on the main power and allow the HMI or control panel to start up.
- Select the correct recipe or settings, if the machine has recipe storage.
- Start the conveyor at low speed.
- Start the cap feeder and confirm a steady flow of seals into the chute.
- Run a small number of vials through the machine at low speed.
- Inspect each trial vial for:
- Seal correctly centred on the vial
- Smooth, even crimp all around the neck
- No wrinkles, pleats or tears in the seal skirt
- No cracks or chips on the vial neck
- Flip-off cap correctly in place
- Seal does not rotate when turned by hand (according to your site’s check method)
- Adjust if needed — roller position, head height or pressure — and repeat the trial.
- Record the trial results and obtain approval to start production, as required by your SOP.
Step 4: Normal Operation
Once trial vials are approved:
- Increase speed gradually to the validated production speed, matching the filling machine’s output.
- Monitor vial flow on the infeed conveyor — vials should arrive steadily without crowding or gaps.
- Keep the cap bowl topped up so the chute never runs empty.
- Watch for alarms on the control panel, such as no-cap, vial jam or guard open.
- Remove rejected vials to the designated reject container, keeping them segregated and counted.
- Avoid reaching into the machine while it is running. Stop the machine before clearing any jam.
Typical upstream equipment
The cap sealer receives vials from filling and stoppering machines such as our liquid vial filling machine with rubber stoppering or, for powders, the injectable dry powder vial filling with rubber stoppering machine (single wheel). The capping machine must be set to handle that machine’s output, with a small margin to recover from brief stoppages.
Step 5: In-Process Checks
Regular checks during the batch confirm that sealing quality remains consistent:
- Visual inspection of sample vials at defined intervals for crimp appearance and seal integrity
- Seal tightness check using the method defined in your SOP — for example, a torque or rotation check
- Vial neck inspection for cracks or chips
- Cap colour and type verification against the batch record
- Reject rate monitoring — a rising reject rate is an early warning of setup drift or wear
Record all checks in the batch record, along with any adjustments made.
Step 6: Downstream Flow
After sealing, vials typically continue to:
- External vial washing, which removes residue and dries vials before labelling — see our automatic external vial washing machine
- Visual inspection for particles, fill level and closure defects — see our visual ampoule and vial inspection machine
- Labelling — for example, with our vertical vial sticker labeller
Step 7: Changeover to a New Vial or Seal Size
When moving to a new product or format:
- Complete the current batch and stop the machine.
- Remove all vials and seals from the machine, conveyors and cap bowl.
- Reconcile seals — issued, used, rejected and returned.
- Clean the machine as described below.
- Fit the new change parts: star wheels, guides, chute and heads.
- Adjust head height and rollers for the new format.
- Complete line clearance and record it before loading new materials.
- Run trial vials and obtain approval, as in Step 3.
Using clearly labelled change parts and recording settings for each format makes future changeovers faster and more consistent.
Step 8: Shutdown
At the end of production:
- Stop the cap feeder and allow remaining seals to clear the chute.
- Run out remaining vials through the machine.
- Stop the conveyor and the machine.
- Switch off main power if required by your SOP.
- Remove unused seals and return or dispose of them according to procedure.
- Record production counts, rejects and any issues in the batch record.
Step 9: Cleaning
Aluminium seals shed fine particles, so regular cleaning is important:
- Remove aluminium dust and debris from the turret, heads, rollers, star wheels and conveyor using approved methods, typically vacuum cleaning rather than compressed air, to avoid spreading particles.
- Wipe surfaces with approved cleaning agents.
- Clean the cap bowl and chute to remove dust and fragments.
- Inspect rollers and plungers during cleaning for wear.
- Label the machine status as clean after cleaning is complete and recorded.
Step 10: Routine Maintenance
Operators and maintenance teams should work together on:
- Daily: cleaning, visual checks of rollers and heads, checking guards and interlocks
- Weekly or by running hours: checking roller wear, bearings and spring tension; lubricating as specified
- Periodically: inspecting drives, belts and gears; verifying sensor operation; checking electrical connections
- Spare parts: keeping rollers, plungers, springs and change parts in stock
Troubleshooting Guide
| Problem | Likely Cause | Corrective Action |
|---|---|---|
| Loose seals that rotate | Roller pressure too low, worn rollers | Increase pressure, replace rollers |
| Wrinkled or pleated seal skirt | Incorrect roller position or speed | Adjust roller height and setting |
| Cracked vial necks | Excessive pressure, misaligned head | Reduce pressure, align head and vial |
| Seal not centred | Cap pick-off misaligned, wrong chute size | Adjust pick-off, fit correct chute |
| No seal on vial | Chute empty, jam, bowl vibration too low | Refill bowl, clear jam, adjust vibration |
| Vials falling or jamming | Wrong star wheel or guide setting | Fit correct parts, adjust guides |
| Torn seals | Damaged seals, excessive pressure | Inspect seal quality, reduce pressure |
| Raised stoppers after capping | Stopper not fully inserted before capping | Check stoppering station upstream |
| Excess aluminium dust | Worn rollers, poor seal quality | Replace rollers, review seal supplier |
Safety Guidelines
- Never operate the machine with guards removed or interlocks bypassed
- Stop the machine before clearing jams or making adjustments
- Wear appropriate gloves when handling broken glass
- Follow lockout procedures during maintenance
- Keep hands, tools and loose clothing away from moving parts
Choosing the Right Number of Heads
Four head machines balance output and simplicity for small to medium production. For very small batches, a Semi-Automatic Vial Cap Sealing Machine or an Automatic Single Head Vial Cap Sealing Machine may be enough, while higher outputs may need six or eight heads. Our comparison of eight head vs single head vial cap sealing machines explains the trade-offs, and our article on choosing the right cap sealing solution covers broader selection criteria. For the basics of how sealing works on any model, see the vial cap sealing machine working principle.
For compact plants, cap sealing can also be integrated into a complete system such as the automatic liquid vial filling line (compact line).
Frequently Asked Questions
How does a four head vial cap sealing machine work? Vials pick up aluminium seals from a chute, then enter a rotating turret where four sealing heads take turns crimping the seals around the vial necks using spinning rollers.
How do I know if the crimp is correct? A correct crimp is smooth and even all around, with no wrinkles or tears, and the seal does not rotate when checked according to your SOP. The vial neck should show no cracks.
What causes cracked vials during capping? Usually excessive roller pressure, misalignment between head and vial, or incorrect head height.
How often should the machine be cleaned? At the end of each batch and at every changeover, with removal of aluminium dust from heads, rollers, star wheels and the cap bowl.
What should I do if seals are loose? Stop the machine, check roller pressure and position, inspect rollers for wear and verify that the correct seals and change parts are being used.
Need a reliable vial cap sealing machine? Explore our capping machines, the full range of glass vial capping machines and all capping machines on Harsiddh Engineering, contact our team or send an inquiry.