
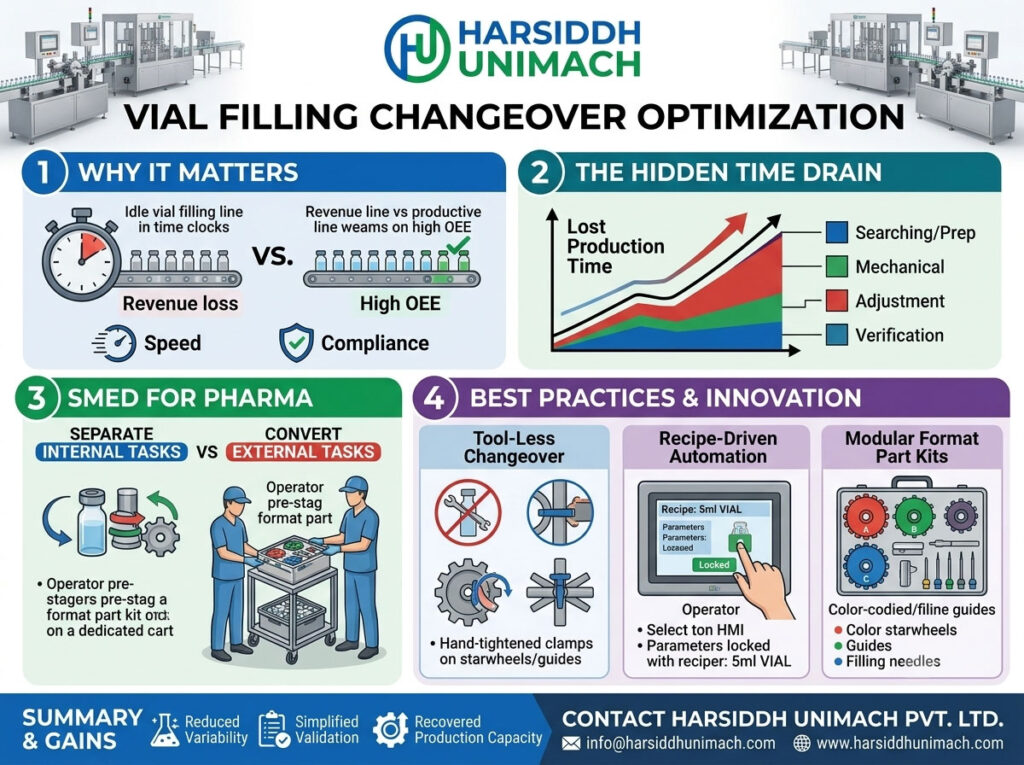
On a vial filling line that runs several products or vial sizes, changeovers are a fact of life. Every time the line moves from one product to another, or from a 2 ml vial to a 10 ml vial, production stops while the line is cleared, cleaned, reconfigured and verified. On busy multi-product lines, changeovers can consume a large share of available production time.
Changeovers are also a high-risk activity. They involve removing and fitting parts, cleaning and sometimes sterilising product-contact components, clearing materials from the previous batch and setting up for the next. Rushed or poorly organised changeovers lead to mix-ups, contamination risks, setup errors and long start-ups with high rejects.
The good news is that changeover time can usually be reduced significantly, without compromising GMP, by applying structured methods. This article sets out practical best practices for faster vial filling machine changeovers, covering both product changes and format changes.
This article focuses on the changeover procedure. For how to design and specify a line that runs several vial sizes in the first place, see our companion article on vial filling machine flexibility and running multiple vial sizes on a single line.
Product Changeover vs Format Changeover
Not all changeovers are the same. Understanding the type helps plan the work.
| Type | What Changes | Main Activities |
|---|---|---|
| Batch changeover (same product) | Batch number, documents | Line clearance, documentation, possibly partial cleaning |
| Product changeover (same vial size) | Product | Full cleaning of product-contact parts, line clearance, setup verification |
| Format changeover (same product) | Vial size, stopper or cap | Change parts, adjustments, setup verification |
| Product and format changeover | Both | Cleaning plus change parts — usually the longest |
Product changeovers are dominated by cleaning and, for sterile products, sterilisation of product-contact parts. Format changeovers are dominated by change parts and adjustments. Many real changeovers combine both.
Why Faster Changeovers Matter
- More production time: every hour saved is an hour available for filling.
- Smaller economic batch sizes: faster changeovers make shorter runs viable, supporting more products and lower inventory.
- Better responsiveness: plants can react faster to orders, especially contract manufacturers.
- Fewer errors: standardised changeovers are more consistent and less error-prone.
The SMED Approach: Internal vs External Work
The most widely used method for reducing changeover time is SMED (Single-Minute Exchange of Die), developed in manufacturing and widely adapted for packaging. Its core idea is simple: separate changeover work into two types.
- Internal work can only be done while the line is stopped, such as removing change parts from the machine.
- External work can be done while the line is still running the previous batch, such as preparing the next set of change parts, components and documents.
The steps are:
- Observe and record the current changeover, timing every activity.
- Classify each activity as internal or external.
- Move external work outside the stop, so it is done before or after.
- Convert internal work to external where possible, for example by pre-assembling parts.
- Streamline remaining internal work, with quicker fastenings, fewer adjustments and parallel tasks.
Illustrative example (not data for any line): a changeover takes 120 minutes. Observation shows that 50 minutes are spent fetching parts, finding tools and preparing documents, all of which could be done before the stop. Moving this work outside the stop reduces the changeover to 70 minutes. Streamlining the remaining internal work, with marked parts and fewer adjustments, saves another 25 minutes, bringing the changeover to 45 minutes. On a line with five changeovers a week, that would release more than six hours of production time weekly.
The same principles are applied to other filling machines in our article on liquid filling machine changeover time and engineering methods to improve efficiency.
SMED Changeover: Move Work Outside the Stop
Best Practice 1: Prepare Before the Line Stops
Preparation is where the biggest time savings usually come from.
- Changeover kit: assemble all change parts for the next format on a dedicated trolley, cleaned and ready.
- Product-contact parts: have cleaned and, where required, sterilised pumps, tubing, needles and manifolds ready, within their validated hold times.
- Components: stage the correct vials, stoppers, caps and labels for the next batch, verified against the batch record.
- Documents: prepare the batch record, setup sheet and line clearance checklist.
- Tools: place any required tools on the trolley in fixed positions.
- People: confirm who will do which task and when.
Best Practice 2: Standardise the Changeover Sequence
A written, standard sequence ensures every changeover is done the same way. A typical sequence for a combined product and format changeover might be:
- End of batch: stop feeding vials, empty the line and reconcile components.
- Line clearance (removal): remove all product, vials, stoppers, caps, labels and documents of the previous batch.
- Disassembly: remove product-contact parts and format parts in a set order.
- Cleaning: clean the machine and area according to the validated cleaning procedure.
- Assembly: fit the cleaned or sterilised product-contact parts and the new format parts.
- Adjustment: set heights, guides and positions using scales or stored recipes.
- Line clearance (verification): a second person checks that the line is clear and correctly set up.
- Priming and setup checks: prime the dosing system, check fill weights on all heads, check stoppering and capping.
- Release: QA or authorised personnel release the line for production.
Display the sequence at the machine and use a checklist so each step is signed off.
Best Practice 3: Make Parts Quick and Foolproof
Machine design has a big influence on changeover speed.
- Tool-less fastenings: hand knobs, quick-release pins and clamps instead of bolts.
- Locating features: dowels and keyed fittings so parts can only be fitted one way and in the right position.
- Colour coding or engraving: each part marked with its format to prevent mix-ups.
- Fewer parts: shared parts between formats where possible.
- Light, manageable parts: easier and safer to handle.
Machines such as a six head liquid vial filling and stoppering machine or a liquid vial filling machine with rubber stoppering should be evaluated for these features before purchase.
Best Practice 4: Eliminate Adjustment
Adjustment, the trial-and-error setting of heights, positions and timings, is often the most variable and time-consuming part of a changeover.
- Recipes: on servo machines, fill volumes, speeds and motion settings are stored for each product and format. An automatic servo based vial filling machine allows settings to be recalled from the operator panel.
- Scales and counters: where manual adjustment is needed, set to recorded values rather than “by eye”.
- Fixed stops: set positions that return parts to the right place automatically.
- Setup sheets: record the correct settings for each format and keep them at the machine.
Best Practice 5: Work in Parallel
Where it is safe and practical, have two or more people work on different parts of the line at the same time, for example one on the filler and one on the capper. Plan the tasks carefully so people do not wait for each other or work in the same space.
Best Practice 6: Optimise Cleaning
For product changeovers, cleaning is often the longest step.
- Disposable product paths, such as peristaltic tubing, remove the need to clean the pump.
- Spare sets of product-contact parts allow one set to be cleaned and sterilised while the other is in use.
- Quick-release parts speed removal for cleaning.
- Validated cleaning procedures that are efficient as well as effective.
- Campaign planning to group products so that less intensive cleaning is needed between similar products, where justified by your cleaning validation.
Best Practice 7: Build In Line Clearance
Speed must never come at the expense of line clearance. Mix-ups between products, vials, stoppers or labels are among the most serious GMP risks.
- Remove all materials from the previous batch, including stray vials and stoppers that may lodge in machines.
- Use a checklist covering every machine and area.
- Have a second person verify and sign.
- Design and maintain machines so there are few hidden places where components can collect.
Best Practice 8: Verify Before Release
Before production resumes, verify:
- correct parts fitted for the format
- correct product and components
- fill weight on every head within limits
- stoppers placed correctly
- caps sealed correctly
- labels and coding correct
A structured verification step prevents a fast changeover from turning into a slow start-up with high rejects.
Machine-by-Machine Changeover Tips
Vial Washer
Change grippers, star wheels and guides; set needle height for the new vial. On an automatic linear vial washer, a linear vial washing machine or a rotary vial washing machine, check that all format parts are marked and stored with the trolley.
Depyrogenation Tunnel
Adjust infeed and outfeed guides. Confirm that the validated cycle for the new format is selected on the sterilizing tunnel for ampoules and vials.
Filler and Stopperer
Change product-contact parts, needles, star wheels and stopper track parts; recall the recipe; prime and check fill weights on every head.
Cap Sealer
Change star wheels, cap chute parts and sealing heads for the neck size; set head height. This applies to machines such as an automatic six head vial cap sealing machine, a vial cap sealing machine with 1, 4, 6 or 8 heads or other glass vial capping machines.
External Washer
Adjust guides and nozzle positions on the automatic external vial washing machine.
Labeller
Change label roll, set guides and label position, and update coding. On a vertical vial sticker labeller, diameter changes are the main adjustment. Our guide to vial sticker labeling machine changeover for different vial diameters has detailed tips.
On an integrated automatic liquid vial filling line, coordinate these tasks across the whole line so no machine becomes the critical path.
Best Practice 9: Measure and Improve
Track every changeover:
- total time from last good vial to first good vial
- time per step
- problems encountered and their causes
- rejects during start-up
Review the data regularly with the team. Look for the longest steps and the most frequent problems, then target improvements. Video recording a changeover, where permitted, is a useful way to spot wasted movement and waiting.
Best Practice 10: Train and Involve the Team
Operators who perform changeovers every day often know where time is lost. Involve them in improvement workshops, train everyone on the standard sequence and confirm competence. Cross-training several people reduces dependence on one expert.
Best Practice 11: Plan the Schedule Smartly
Production planning affects changeover load:
- group products with similar formats together
- sequence products to reduce cleaning intensity where justified
- schedule major changeovers when maintenance can be done at the same time
- avoid unnecessary changeovers by balancing batch sizes and inventory
Linking Changeovers to Maintenance
Changeovers are a good opportunity to inspect wear parts, such as star wheel pockets, guides, seals and tubing. Include quick inspections in the changeover checklist so problems are found before they cause stoppages. Our article on vial filling machine maintenance best practices covers maintenance in more detail.
Lessons From Ampoule Lines
Many of the same principles apply to ampoule filling and sealing lines, with additional attention to burner settings for different ampoule sizes. See our article on ampoule filling machine changeover and reducing downtime between ampoule sizes.
Changeover Checklist Summary
| Phase | Key Actions |
|---|---|
| Before the stop | Prepare kit, parts, components, documents, people |
| End of batch | Empty line, reconcile components |
| Line clearance | Remove all previous batch materials |
| Disassembly and cleaning | Follow set order and validated cleaning |
| Assembly and setup | Fit marked parts, recall recipe, set to recorded values |
| Verification | Second-person check, fill weights, stoppering, capping, labelling |
| Release | Authorised release to production |
| After | Record times and issues, clean and store parts |
Frequently Asked Questions
How long should a vial filling changeover take? It depends on the type of changeover, machine design, cleaning requirements and team. The best target is continuous improvement against your own baseline.
Can changeovers be made faster without compromising GMP? Yes. Most savings come from preparation, standardisation and machine design, not from skipping cleaning or line clearance.
What is the biggest source of lost time? Often it is preparation done during the stop, such as searching for parts and tools, and trial-and-error adjustment.
Do servo machines change over faster? Generally yes, because settings can be stored in recipes, reducing adjustment.
Should we buy spare product-contact parts? For frequent product changeovers, a second set allows cleaning and sterilisation outside the stop, which can save significant time.
Make Changeovers Faster With Harsiddh
Harsiddh Unimach designs vial washers, sterilising tunnels, filling and stoppering machines, cap sealers, external washers and labellers with changeover in mind: marked format parts, quick-release fittings and recipe-based settings on servo models. Our team can advise on change parts, setup and training for your vial formats.
Contact us through our contact page or send your requirements through our inquiry form.