
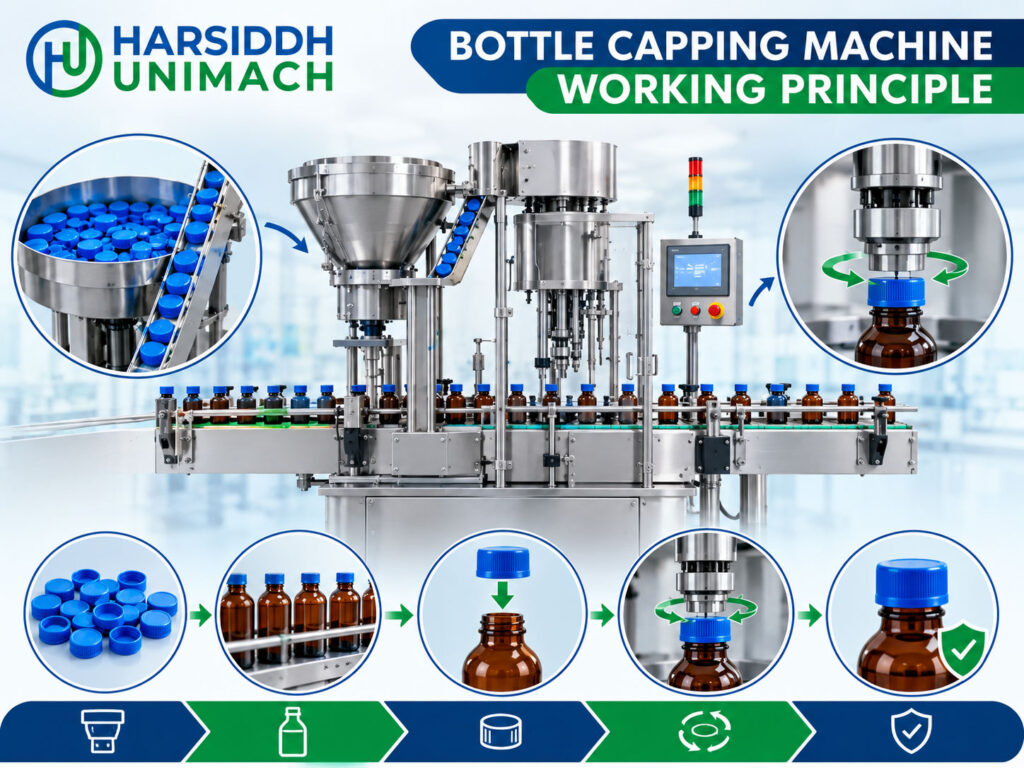
A bottle is only as good as its closure. The cap protects the product from leakage, contamination and tampering, keeps it stable throughout its shelf life and is often the first thing a customer touches. Whether it is a syrup bottle in a pharmacy, a shampoo on a store shelf or an edible oil bottle in a kitchen, the cap must be applied correctly — every time.
Bottle capping machines automate this job. They feed caps, place them on bottles and secure them by screwing, rolling, pressing or crimping, depending on the closure type. While the basic idea is simple, getting consistent, correctly tightened caps at production speed depends on precise mechanics and careful setup.
This guide explains how bottle capping machines work, the different capping methods and machine designs, the settings that determine capping quality and how to troubleshoot common problems. It also links to our detailed articles on specific capping types for readers who want to go deeper.
What Does a Bottle Capping Machine Do?
Every bottle capping machine performs four core functions:
- Cap feeding – sorting and orienting loose caps and delivering them to the capping point
- Cap placement – positioning a cap on each bottle neck
- Cap application – securing the cap by screwing, rolling, pressing or crimping
- Bottle handling – holding bottles steady and moving them through the machine
How each function is carried out depends on the cap type and the machine design.
Step 1: Cap Feeding and Orientation
Caps are usually loaded in bulk into a hopper. From there, a feeding system orients them correctly — open side down, ready to be placed on bottles.
Common cap feeding systems
- Vibratory bowl feeders – vibration moves caps up a spiral track, where tooling rejects incorrectly oriented caps back into the bowl.
- Cap elevators – a belt or cleated conveyor lifts caps from a hopper and orients them, often used for larger caps or higher speeds.
- Centrifugal sorters – a rotating disc orients caps at high speed.
Oriented caps travel down a cap chute to the placement point. A sensor monitors the chute level and controls the feeder so the supply never runs out or overflows.
Step 2: Cap Placement
There are two main ways to put a cap on a bottle.
Pick-off (on-the-fly) placement
The cap sits at the end of the chute. As each bottle passes, its neck catches the cap and pulls it out, leaving the cap resting loosely on top. Common on inline and many rotary machines.
Pick-and-place
A gripper or vacuum head picks a cap from the chute and places it accurately onto the bottle neck — sometimes starting the threads at the same time. Pick-and-place is preferred for caps that are difficult to pick off, such as tall caps, pumps and triggers. Learn more in the pick and place capping machine working principle.
Step 3: Cap Application — The Main Capping Methods
Screw capping
Used for threaded plastic and metal caps on syrups, tablets, shampoos, oils and many other products.
How it works: a capping head (or a set of spinning discs) rotates the cap onto the bottle thread. A torque-limiting clutch — magnetic, mechanical or servo-controlled — stops tightening once the set torque is reached, so caps are tight enough to seal but not so tight that they are hard to open or damage the thread.
Screw capping can be done by:
- Chuck-type heads that grip the cap from above and spin it
- Spindle cappers where pairs of spinning discs or wheels contact the sides of the cap as bottles pass through
See the Automatic Four Head Bottle Screw Capping Machine, the Automatic Linear Capping Machine and our linear capping machine. For more detail, read the bottle screw capping machine working principle.
ROPP (roll-on pilfer-proof) capping
Widely used for pharmaceutical syrups and liquors.
How it works: an unthreaded aluminium cap is placed on the bottle. A capping head presses down on the cap top while threading rollers roll the soft aluminium into the bottle’s threads, forming the thread on the cap. Pilfer-proof rollers then tuck the bottom band under the bottle’s neck ring, creating a tamper-evident seal that breaks when the cap is first opened.
Learn more in the bottle ROPP capping machine working principle, and see our bottle screw and ROPP capping machine.
Press-on (snap-on) capping
Used for snap-fit caps, plugs and some dispensing closures.
How it works: the cap is placed on the bottle and pressed down by a belt, roller or plunger until it snaps into place.
Lug capping
Used for lug (twist-off) closures on glass jars and bottles, common in food products.
How it works: the cap’s lugs engage with interrupted threads on the container. The capping head turns the cap a fraction of a turn while pressing down, often under steam or vacuum to create a seal. See the lug capping machine working principle and our lug capping machine.
Crown capping
Used for crown corks on glass bottles, typically for beverages.
How it works: a crowning head presses the crown cap down and crimps its fluted edge around the bottle lip. See the Automatic Bottle Crown Capping Machine.
Comparison of Capping Methods
| Method | Cap Type | Securing Action | Typical Products |
|---|---|---|---|
| Screw capping | Threaded plastic or metal caps | Rotating to set torque | Syrups, tablets, shampoos, oils |
| ROPP capping | Unthreaded aluminium caps | Rolling threads and pilfer band | Pharmaceutical syrups, liquors |
| Press-on | Snap caps, plugs | Pressing | Dispensers, some liquids |
| Lug capping | Lug / twist-off caps | Partial turn with pressing | Food jars, sauces |
| Crown capping | Crown corks | Pressing and crimping | Beverages |
Machine Designs: Inline vs Rotary
Inline (linear) capping machines
Bottles travel in a straight line on a conveyor. Caps are placed and tightened as bottles pass through, often by spindle wheels or a series of heads.
Advantages:
- Simple, flexible and easy to change over
- Suits a wide range of bottle shapes and sizes
- Lower investment
Best for: small to medium output and plants with many products.
Rotary capping machines
Bottles are transferred by star wheels into a rotating turret with multiple capping heads. Each head picks up or receives a cap and applies it as the turret rotates.
Advantages:
- Higher speeds and precise control
- Consistent torque with individual heads
- Suitable for integration with high-speed fillers
Best for: medium to high output lines.
Semi-automatic capping machines
An operator places each bottle under the capping head, and the machine applies the cap. Ideal for small batches and start-ups. See our semi-automatic screw capping machine and semi-automatic ROPP capping machine.
Monoblock filling and capping machines
Filling and capping on one base, saving space and reducing transfers. See our liquid bottle filling and capping machine (monoblock).
Bottle Handling During Capping
Bottles must be held still and upright while caps are applied, especially for screw capping, where rotation could otherwise spin the bottle. Machines use:
- Side gripper belts that clamp bottles as they pass through spindle cappers
- Star wheels and neck supports in rotary machines
- Bottle stabilising guides for tall or lightweight containers
Correct handling is essential for consistent torque and avoiding cross-threaded caps.
Torque Control and Why It Matters
For screw caps, application torque is critical:
- Too low: caps can loosen, leak or allow contamination
- Too high: caps are hard to open, threads may strip, and liners may be damaged
Torque is controlled by clutches or servo drives and should be verified regularly with a torque tester. Removal torque — the force needed to open the cap — is also checked, since it can change after induction sealing or storage.
After Capping: Sealing and Accessories
Many lines add steps after capping:
- Induction sealing – bonds a foil liner in the cap to the bottle mouth for tamper evidence and leak protection. See our induction sealing machine.
- Measuring cup placement – for syrups
- Labelling and coding
Key Settings That Determine Capping Quality
| Setting | Effect if Incorrect |
|---|---|
| Cap feeder speed and tooling | Missing, jammed or misoriented caps |
| Pick-off position | Tilted or missing caps |
| Head or spindle height | Poor contact, uneven tightening |
| Torque setting | Loose or over-tight caps |
| ROPP roller pressure and position | Poor threads, weak pilfer band, damaged caps |
| Gripper belt pressure | Bottle rotation or deformation |
| Conveyor speed | Insufficient capping time or bottle instability |
Troubleshooting Common Capping Problems
| Problem | Likely Cause | Solution |
|---|---|---|
| Loose caps | Low torque, worn clutch, slipping grippers | Adjust torque, service clutch, check belts |
| Over-tight caps | High torque setting | Reduce torque, verify with tester |
| Cross-threaded caps | Cap tilted at placement, misaligned head | Adjust pick-off, align head |
| Missing caps | Chute empty, feeder problems | Check feeder and chute sensors |
| Damaged caps | Excessive pressure, worn chucks | Reduce pressure, replace chucks |
| Poor ROPP threads | Incorrect roller settings | Adjust roller position and pressure |
| Bottles spinning | Insufficient gripping | Increase grip, check belt wear |
Capping in Pharmaceutical Production
Pharmaceutical capping has some additional requirements compared with general packaging:
- Tamper evidence – ROPP caps, induction seals and breakable bands show whether a bottle has been opened
- Child resistance – some medicines require child-resistant closures, which need suitable capping heads
- Validated torque ranges – application and removal torque are defined and checked during production
- Line clearance – caps from previous batches must be removed completely before a new batch starts
- Cleanable construction – stainless steel parts and easy access for cleaning
- Documentation – qualification records for the capping machine as part of the line
Meeting these requirements reliably is much easier with automatic machines that maintain consistent settings and include sensors for missing or incorrectly placed caps.
Choosing the Right Capping Machine
Consider:
- Cap type – screw, ROPP, press-on, lug or crown
- Bottle type – glass or plastic, round or flat, size range
- Output – semi-automatic, inline or rotary
- Torque requirements and control method
- Changeover needs – number of products and formats
- Line integration – matching filler speed
- GMP requirements – for pharmaceutical products
For a structured approach, read choosing the right capping machine for your pharmaceutical production line. Explore our capping machines, the capping machine for glass and PET bottles range and all capping machines on Harsiddh Engineering.
Maintenance Tips
- Clean cap feeders, chutes and heads regularly
- Inspect chucks, spindle wheels and rollers for wear
- Check and calibrate torque clutches
- Replace gripper belts when worn
- Lubricate moving parts as specified
- Keep change parts for each cap and bottle size organised and labelled
Frequently Asked Questions
What is the working principle of a bottle capping machine? It feeds and orients caps, places them on bottles and secures them by screwing, rolling, pressing or crimping, while holding bottles steady.
What is the difference between screw capping and ROPP capping? Screw capping turns a pre-threaded cap onto the bottle. ROPP capping forms threads on an unthreaded aluminium cap using rollers and creates a tamper-evident band.
What is the difference between inline and rotary capping machines? Inline machines cap bottles moving in a straight line and are flexible; rotary machines use a turret of heads for higher speeds and precise control.
Why is torque control important? Correct torque ensures caps seal properly without being too hard to open or damaging threads.
Can one machine handle different cap types? Some machines handle several cap sizes with change parts, but different closure types (screw vs ROPP vs crown) usually require different heads or machines.
Need help choosing a bottle capping machine? Contact our team or send an inquiry to discuss your bottles and caps.