
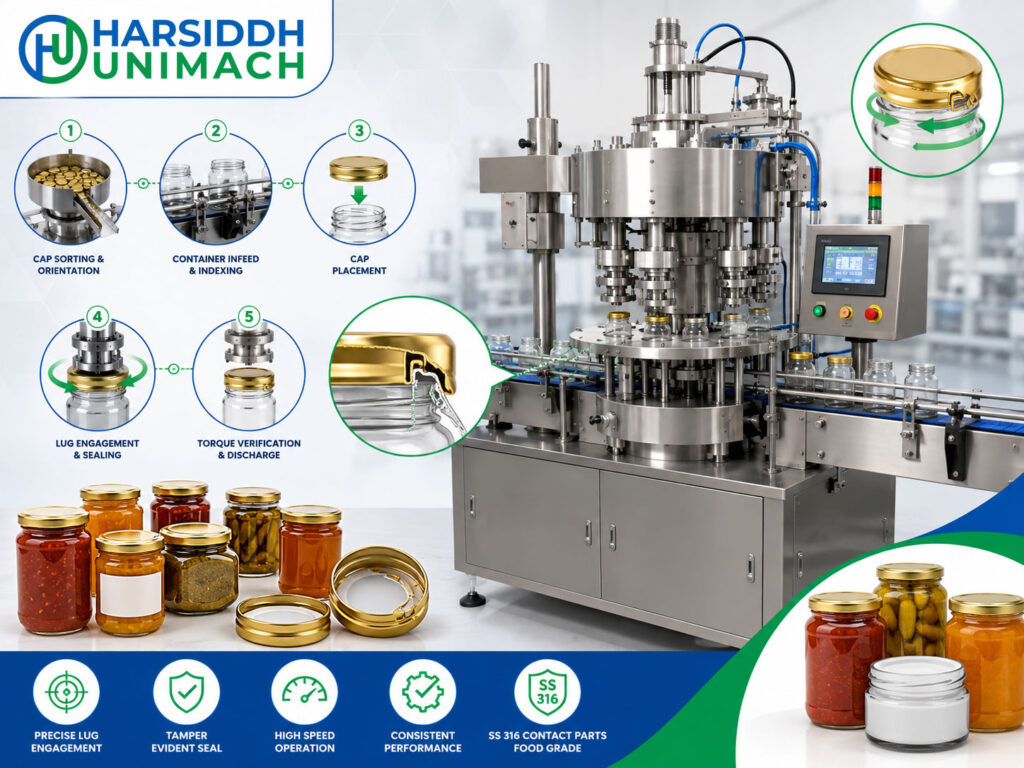
Open a jar of honey, jam, pickle, sauce, ghee or an Ayurvedic preparation, and there is a good chance the lid comes off with a short twist rather than several full turns. That lid is a lug cap, and the machine that applies it is a lug capping machine.
Lug caps are metal closures with small inward-facing tabs called lugs. Instead of a continuous thread, they lock onto matching interrupted threads on a glass container’s neck. Only a partial turn is needed to close or open them. Combined with a sealing compound inside the cap and, in many applications, a vacuum in the headspace, lug caps give a secure, tamper-evident seal that consumers find easy to use.
In this article, we explain how lug caps work, how a lug capping machine places and tightens them, how steam and vacuum options create a hermetic seal, which machine designs are available, the settings that matter most and how to solve common problems.
For a broad comparison of capping methods, read our guide to the bottle capping machine working principle.
What Is a Lug Cap?
A lug cap is usually made of coated tinplate or a similar metal sheet. Its main features are:
- Lugs – small tabs formed inward around the edge of the cap skirt. Caps typically carry several lugs spaced evenly around the edge, with the number depending on cap size.
- Sealing compound (liner) – a ring or panel of soft sealing compound, often plastisol, applied inside the cap top. When the cap is tightened, the glass rim presses into this compound to form the seal.
- Safety button (on some caps) – a raised centre panel that is pulled down when a vacuum forms inside the jar and pops up when the seal is broken, giving a visible tamper indication.
The container has a matching lug finish: short, sloping thread segments on the glass neck. Each lug on the cap slides under one segment. As the cap turns, the slope pulls the cap down onto the rim and compresses the sealing compound.
Lug caps vs screw caps
| Feature | Lug Cap | Screw Cap |
|---|---|---|
| Thread type | Interrupted thread segments on the container | Continuous thread |
| Turn to close | Partial turn | One or more full turns |
| Material | Usually metal | Usually plastic, sometimes metal |
| Seal | Compound pressed by the rim, often with vacuum | Liner or wad compressed by the rim |
| Typical containers | Glass jars and wide-mouth bottles | Bottles of many materials |
| Typical products | Food, honey, sauces, preserves, some herbal and nutraceutical products | Syrups, oral liquids, cosmetics, chemicals |
If you mainly use threaded plastic caps, see our bottle screw capping machine working principle. For aluminium caps that are thread-rolled on the bottle, see our bottle ROPP capping machine working principle.
The Working Principle in Brief
A lug capping machine:
- Feeds lug caps, oriented open side down
- Places a cap squarely on each container’s mouth
- Optionally flushes the headspace with steam or another medium to drive out air
- Presses and twists the cap so the lugs engage the thread segments
- Tightens the cap to the correct position or torque, compressing the sealing compound
- Discharges the sealed container for cooling, inspection and labelling
The aim is a cap that sits level, with all lugs properly engaged and the compound evenly compressed all the way around the rim.
Main Components of a Lug Capping Machine
- Cap hopper and elevator or sorter – stores and orients metal caps.
- Cap chute – delivers caps in a single line to the placement point.
- Container conveyor – carries filled jars through the machine.
- Infeed spacing system – a worm, star wheel or timing device that spaces containers.
- Cap placement station – where each cap is picked off by the container or placed by a head.
- Steam or flushing tunnel (optional) – fills the headspace with steam just before and during cap placement.
- Pressing and tightening section – either rotating chucks or a set of twisting belts and pressure belts.
- Side gripping belts or star wheel pockets – hold containers firmly so they cannot rotate.
- Torque or position adjustment – clutch setting, belt speed difference or head stroke.
- Control panel and sensors – speed control, cap presence, container presence and safety interlocks.
Step-by-Step: How a Lug Capping Machine Works
Step 1: Preparation of containers
Glass jars and bottles are usually unscrambled, washed and inspected before filling. On many lines this involves a bottle unscrambler and a linear bottle washing machine, or an automatic bottle air-jet and vacuum cleaning machine where dry cleaning is preferred. Clean, dry rims matter for lug capping, because any product or moisture on the rim can interfere with the sealing compound.
Step 2: Filling
Containers are filled to the correct level. Liquids and thin products may be filled on a volumetric liquid bottle filling machine, while thicker products such as pastes and preserves use piston or other suitable fillers. Leaving the right headspace is important: too little and product may contact the compound or spill; too much and the vacuum may be weaker than intended.
Step 3: Cap feeding and orientation
Caps are loaded into the hopper. A sorter or elevator orients them open side down and feeds them into the chute. Because lug caps are metal and relatively flat, chutes are designed to prevent caps from overlapping or flipping.
Step 4: Headspace flushing (if required)
On lines that need a vacuum seal, the container passes under a steam flush just before the cap is placed. Steam displaces air in the headspace. When the cap is applied and the steam later condenses as the container cools, it creates a partial vacuum that pulls the cap down tightly and draws in the safety button. Some products are hot-filled instead, which can produce a similar effect as the product cools. Other lines run without flushing when vacuum is not needed.
Step 5: Cap placement
There are two main placement methods:
- Pick-off placement – the container’s rim catches the leading cap from the angled end of the chute, and the cap is drawn onto the mouth.
- Head placement – a chuck or placement head lowers the cap onto the container.
In both cases, a pressure plate or guide then levels the cap before tightening. A cap that arrives tilted can cause a lug to ride over its thread segment instead of under it.
Step 6: Pressing and twisting
This is where the cap is actually secured. Depending on the design:
- Chuck-type machines lower a rotating chuck onto the cap. The chuck presses down and turns the cap so that the lugs slide under the thread segments and pull it down.
- Belt-type machines pass the container between side gripping belts that hold it steady while one or more overhead pressure belts push down on the cap. Twisting belts or discs running at different speeds rotate the cap through its partial turn as the container moves forward.
As the lugs travel down the sloping thread segments, the cap is drawn evenly onto the rim and the sealing compound is compressed.
Step 7: Tightening control
The correct tightness is reached when all lugs are fully engaged and the compound is evenly compressed. On chuck machines, a torque-limiting clutch controls this. On belt machines, the belt speed difference, belt pressure and length of the twisting zone are adjusted until caps consistently reach the correct position.
Because a lug cap closes in a partial turn, both under-tightening and over-tightening show up quickly. An under-tightened cap may not seal; an over-tightened one can cut into the compound or bend the lugs.
Step 8: Discharge, cooling and inspection
The sealed container leaves on the outfeed conveyor. On vacuum-sealed lines, the vacuum develops as the container cools. Containers then pass to visual inspection, coding, labelling and packing.
Types of Lug Capping Machines
Automatic inline belt-type lug cappers
Containers move continuously between gripping belts, and caps are pressed and twisted on the move. These machines are compact, handle a range of container sizes and integrate easily into existing conveyor lines. See the Automatic Bottle Lug Capping Machine and the lug capping machine on Harsiddh Engineering.
Rotary chuck-type lug cappers
Containers are held in star wheel pockets while rotating chucks apply the caps. These give very consistent tightening and stable container handling, which suits dedicated, higher-output lines.
Steam-vacuum lug cappers
Inline or rotary machines fitted with a steam flushing tunnel and the controls needed to create a vacuum seal. These are common in food preservation and for products where vacuum and a safety button are part of the pack’s tamper evidence.
Semi-automatic lug cappers
The operator places the cap on the container and a powered head presses and twists it. These suit small batches, product trials and start-ups.
Related closure machines
Lug caps are one of several closures used on glass containers. Depending on the product, you may also consider:
- Automatic Bottle Twist Off Capping Machine for twist-off closures
- Automatic Bottle Crown Capping Machine for crown corks on beverage bottles
- Automatic Jar Capping Machine for wide-mouth jars with threaded lids
Where Lug Capping Is Used
- Food – jams, honey, pickles, sauces, spreads, baby food, preserves
- Beverages – some juices and concentrates in glass bottles
- Ayurvedic and herbal products – pastes, churnas, chyawanprash-type preparations and syrups in glass jars
- Nutraceuticals – some powders and preparations in glass
- Personal care – selected creams and balms in glass jars
The common factor is a glass container with a lug finish and a need for a secure, often vacuum-assisted, seal.
Key Settings and Their Effects
| Setting | What It Controls | Effect If Wrong |
|---|---|---|
| Cap chute and pick-off position | How cleanly caps are collected | Missing, tilted or double caps |
| Pressure plate height | Levelling the cap before twisting | Lugs riding over thread segments |
| Pressure belt height and force | Downward force during twisting | Caps not seated, or compound cut |
| Twisting belt speed difference | Amount of rotation applied | Under- or over-tightened caps |
| Side gripping belt pressure | Holding the container still | Containers spinning or tilting |
| Chuck torque (chuck machines) | Final tightness | Leaks or damaged lugs |
| Steam flow and position | Headspace flushing | Weak vacuum or condensation problems |
| Conveyor speed | Time in each zone | Incomplete flushing or twisting |
Checking Lug Cap Quality
Lug capping is checked with a combination of tests:
- Visual check – caps level, not cocked, with no bent lugs or scratched coating
- Lug position – the lugs should sit in a consistent position relative to the thread segments; some plants mark a reference line on cap and jar to check this quickly
- Removal torque – measured with a torque tester to confirm caps open within the agreed range
- Vacuum and safety button – on vacuum-sealed packs, the button should be drawn down after cooling; vacuum can also be measured with suitable gauges
- Security or “pull-up” – the cap should not lift or rock when pressed at the edge
The right values for removal torque, lug position and vacuum depend on the cap and container suppliers’ specifications and your product, so agree them with your suppliers and quality team.
Troubleshooting Common Lug Capping Problems
| Problem | Likely Cause | Solution |
|---|---|---|
| Cocked (tilted) caps | Cap not levelled before twisting, pick-off misaligned | Adjust pressure plate and pick-off position |
| Loose caps | Too little rotation or downward force | Increase belt speed difference or pressure; check chuck torque |
| Over-tightened caps, damaged compound | Excessive rotation or force | Reduce twist and pressure |
| Bent or stripped lugs | Cap forced while tilted, excessive torque | Improve levelling, reduce torque |
| Weak or no vacuum | Insufficient steam, too much headspace, slow capping after flush | Adjust steam, check fill level, reduce delay |
| Safety button not pulled down | Weak vacuum or poor seal | Check steam, capping tightness and rim condition |
| Containers spinning | Low side belt pressure or worn belts | Adjust or replace belts |
| Scratched cap coating | Worn belts or misaligned guides | Replace belts, realign guides |
| Leakage | Product on rim, chipped glass, damaged compound | Improve filling, inspect containers and caps |
Maintenance Tips
- Inspect gripping, pressure and twisting belts for wear, glazing and cracks; worn belts give inconsistent tightening.
- Clean product and sugar residues from belts, guides and the cap chute, especially on food and syrup lines.
- Check steam lines, nozzles and condensate drains on steam-vacuum machines.
- Verify removal torque and lug position at start-up and at regular intervals.
- Lubricate drives and bearings according to the maintenance schedule.
- Keep change parts and settings for each cap and container size documented.
Changeover Between Cap and Container Sizes
Changing size on a lug capper usually involves:
- Adjusting or changing cap sorter tooling and chute guides
- Resetting side gripping belt width and height for the new container
- Adjusting pressure and twisting belt height for the new cap
- Changing star wheels or infeed parts (on rotary machines)
- Re-setting steam nozzles for the new container height
- Running test containers and checking removal torque, lug position and vacuum
Height scales, recorded settings and a changeover checklist make the job faster and more repeatable.
How to Choose a Lug Capping Machine
- Cap size and type – diameter range, safety button, number of lugs
- Container – glass jar or bottle, shape, height and finish
- Vacuum requirement – whether steam flushing is needed
- Output – semi-automatic, inline belt or rotary chuck design
- Product – hot fill or cold fill, viscous or liquid, food or pharmaceutical
- Hygiene requirements – materials, cleanability and GMP needs
- Line integration – speed matching with your filler, coder and labeller
For a step-by-step selection approach, read choosing the right capping machine for your pharmaceutical production line. Explore our full range of capping machines, the capping machines for glass and PET bottles and all capping machines on Harsiddh Engineering.
After capping, round jars and bottles can be labelled on our labeling machines for round bottles, and filled containers can be checked on a bottle visual inspection table before labelling.
Frequently Asked Questions
What is a lug capping machine? A machine that applies metal lug caps to glass containers by placing each cap on the mouth and pressing and twisting it so that its lugs lock under the container’s thread segments.
How is a lug cap different from a screw cap? A lug cap uses lugs and interrupted thread segments and closes with a partial turn. A screw cap uses a continuous thread and needs one or more full turns.
Why is steam used in lug capping? Steam drives air out of the headspace. When it condenses after capping, it forms a partial vacuum that holds the cap down and pulls in the safety button.
What causes cocked lug caps? Usually a cap that was not levelled before twisting, a misaligned pick-off or worn pressure belts.
How do I check lug cap tightness? By measuring removal torque, checking lug position against a reference mark and, on vacuum packs, checking the safety button and vacuum level.
Need a lug capping machine for your glass jars or bottles? Contact our team or send an inquiry with your cap and container details.