
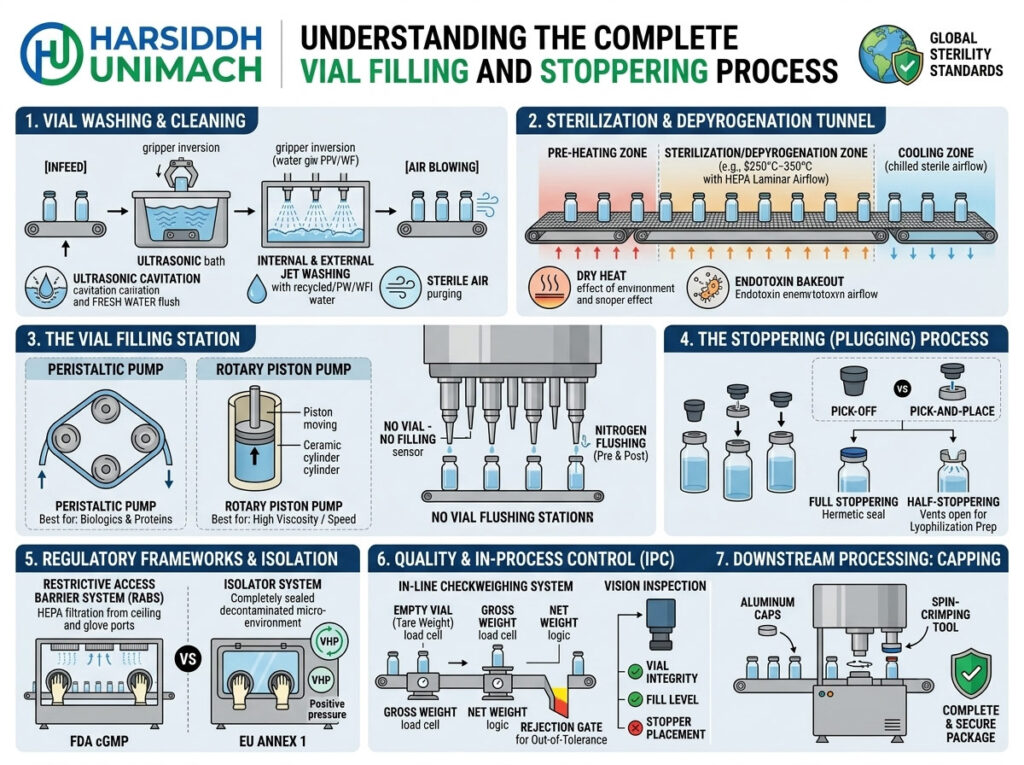
Filling a vial is only half the job. The moment a sterile liquid enters an open vial, the product is at its most vulnerable — exposed to the surrounding air until a rubber stopper closes the container. That is why filling and stoppering are almost always performed together, on the same machine, within seconds of each other, in the most tightly controlled part of the cleanroom.
Together, these two steps determine whether each vial contains the right dose, whether that dose stays sterile, and whether the closure will protect the product throughout its shelf life. Problems at this stage — inaccurate fills, missing stoppers, raised stoppers, particles or interventions — lead directly to rejects, investigations and risk to patients.
In this guide, we take a detailed look at the complete vial filling and stoppering process: how vials and stoppers are prepared, how the product is dosed, how stoppers are fed and inserted, how full and partial stoppering differ, which controls ensure quality, and which best practices keep the process reliable. For a broader overview of the full production flow, see our article on the vial filling machine working principle and process flow in pharmaceuticals.
Why Filling and Stoppering Belong Together
In aseptic processing, the time between filling and closing must be as short as possible. Every second that a filled vial remains open increases the chance of airborne contamination. Combining filling and stoppering on one machine:
- Minimises exposure time of the open product
- Removes a transfer step, reducing handling and breakage
- Keeps both operations within the Grade A zone under unidirectional airflow or a RABS
- Allows integrated controls, so a vial is only stoppered if it has been filled correctly — and vice versa
- Reduces floor space and line complexity
Machines designed for this purpose include the Automatic Injectable Liquid Vial Filling and Stoppering Machine and our liquid vial filling machine with rubber stoppering.
Stage 1: Preparing the Vials
Before vials reach the filling machine, they must be clean, sterile and free of pyrogens.
Washing
Vials are washed inside and out with alternating jets of water and filtered compressed air, finishing with a final rinse of water of the specified quality. A washer such as our rotary vial washing machine removes dust, glass particles and residues from manufacturing and transport.
Depyrogenation and sterilisation
Washed vials pass through a hot-air tunnel that dries, sterilises and depyrogenates them, then cools them under filtered airflow before they enter the filling area. See our sterilizing tunnel for ampoules and vials.
Infeed to the filler
Sterile vials leave the tunnel onto an infeed turntable in the Grade A zone, which buffers the flow and feeds them into the filling machine’s transport system — typically an infeed worm and star wheels.
Stage 2: Preparing the Stoppers
Rubber stoppers are just as critical as the vials. They must be clean, sterile, low in particles and properly treated so they feed smoothly and seal reliably.
Stopper materials and designs
Stoppers are usually made of halobutyl rubber (bromobutyl or chlorobutyl), chosen for low gas permeability and chemical compatibility. Common designs include:
- Serum stoppers – solid stoppers for liquid products, fully inserted after filling
- Lyophilisation stoppers – with legs or slots that create vapour vents when partially inserted
- Coated stoppers – with a barrier film to reduce interaction with sensitive products
Washing, siliconisation and sterilisation
Traditionally, stoppers are washed, lightly siliconised to reduce friction and prevent sticking, sterilised (usually by steam) and dried before use. Many manufacturers now use ready-to-use (RTU) or ready-to-sterilise stoppers supplied by the stopper manufacturer, which reduces in-house processing and variability.
Transfer to the machine
Sterile stoppers are transferred to the machine’s stopper bowl using aseptic transfer methods — for example, sealed bags or transfer ports — to avoid contamination during loading.
Stage 3: Filling the Vial
Positioning
The infeed worm separates vials and spaces them correctly. Star wheels or gates position each vial precisely beneath a filling nozzle. Sensors confirm that a vial is present before any product is dispensed — the no-vial-no-fill principle.
Dosing
A dosing pump measures the exact volume for each vial:
- Piston pumps deliver accurate doses across a wide range of volumes and viscosities.
- Peristaltic pumps move product through flexible tubing, keeping the product path closed and single-use where required. See our peristaltic based liquid filling machine.
Bottom-up filling with diving nozzles
The nozzle descends into the vial and rises as the liquid level increases. This reduces foaming, splashing and air entrapment, and keeps the vial neck dry — important because liquid on the neck can interfere with stopper seating and container closure.
Drip prevention and gassing
At the end of the dose, a short suck-back prevents dripping. For oxygen-sensitive products, nitrogen is used before filling to displace air and after filling to blanket the headspace until the stopper is inserted.
Fill weight checks
At regular intervals, sample vials from each nozzle are weighed to confirm fill accuracy. Servo-driven machines allow individual nozzle adjustment if results drift.
Stage 4: Feeding the Stoppers
Reliable stopper feeding is one of the most important — and most sensitive — parts of the process.
The vibratory bowl
Stoppers are loaded into a stainless steel vibratory bowl. Controlled vibration moves them up a spiral track, where tooling orients each stopper correctly and rejects any that are upside down or on their side back into the bowl.
The chute or track
Oriented stoppers travel down a chute or linear track to the stoppering station in a continuous line. A level sensor monitors the stopper supply and signals the bowl to run or stop.
What can go wrong
- Stoppers sticking together – often due to insufficient or uneven siliconisation, or static
- Jams in the chute – caused by dimensional variation, damaged stoppers or incorrect track settings
- Starvation – the bowl cannot keep up with machine speed
- Particles – generated by stoppers rubbing against each other or the bowl
Each of these can stop the machine and lead to interventions in the critical zone, so bowl tuning, stopper quality and correct settings matter greatly.
Stage 5: Inserting the Stopper
Stoppering methods
Two main methods are used:
- Pick-and-place stoppering: a vacuum head picks a stopper from the end of the chute and presses it into the vial neck as the vial passes beneath.
- Rotary stoppering wheel or “wipe-on” placement: the vial picks up a stopper from the chute as it moves past, and a pressing station then pushes the stopper fully into place.
Full stoppering
For liquid products, the stopper is pressed fully into the vial neck so its flange sits flat on the vial lip. This creates the primary seal until the aluminium crimp cap is applied.
Partial stoppering for lyophilisation
For freeze-dried products, lyophilisation stoppers are inserted only partially, leaving vents open so water vapour can escape during freeze-drying. The vials are then transferred to the freeze dryer, where shelves press the stoppers fully home at the end of the cycle. Consistent partial insertion height is critical: too deep and vents close; too shallow and stoppers can fall out during transfer.
Read more about how placement affects quality in our article on how stopper placement affects container closure quality.
Stopper verification
Sensors after the stoppering station check that each vial has a stopper and that it is at the correct height. Vials with missing, raised or tilted stoppers are automatically rejected.
Stage 6: After Stoppering
Stoppered vials move to the capping machine, where an aluminium seal is crimped over the stopper to secure it and provide tamper evidence. See our range of glass vial capping machines. In some designs, filling, stoppering and capping are combined on one base — explained in our article on monoblock vial filling, stoppering and capping.
Vials are then inspected for particles, fill level and closure defects, using equipment such as our visual ampoule and vial inspection machine, before labelling and packing.
Filling and Stoppering Sterile Powders
For sterile powders, the process is similar but the dosing system is different. A vacuum-pressure powder wheel draws powder into precisely sized bores and discharges each dose into a vial, which is stoppered immediately. Machines include the Automatic Injectable Vial Dry Powder Filling and Stoppering Machine (Servo Based) and our double wheel injectable dry powder filling machine with vial rubber stoppering. Explore all injectable powder filling machines.
Process Summary
| Step | Purpose | Key Control |
|---|---|---|
| Vial washing | Remove particles and residues | Water and air quality, pressures |
| Depyrogenation | Sterilise and remove endotoxins | Temperature profile, belt speed |
| Stopper preparation | Clean, sterile, free-feeding stoppers | Siliconisation, sterilisation |
| Vial positioning | Place vial under nozzle | No-vial-no-fill sensing |
| Dosing | Deliver correct volume | Fill weight checks |
| Bottom-up filling | Avoid foaming and wet necks | Nozzle dive and rise profile |
| Gassing | Protect oxygen-sensitive product | Nitrogen flow and timing |
| Stopper feeding | Supply oriented stoppers | Bowl tuning, level sensing |
| Stopper insertion | Close the vial | Insertion height, presence check |
| Capping | Secure the stopper | Crimping force |
Critical Quality Controls
- Fill accuracy: checked at defined intervals for every nozzle
- Stopper presence and height: checked by sensors on every vial
- Environmental monitoring: viable and non-viable particles in the Grade A zone during filling
- Interventions: documented, with only approved and qualified intervention types allowed
- Aseptic process simulation (media fills): periodically demonstrate that the process can consistently produce sterile product
- Container closure integrity: verified through validated methods as part of product and process qualification
Common Problems and Solutions
| Problem | Likely Cause | Solution |
|---|---|---|
| Raised or tilted stoppers | Misaligned stoppering head, wet neck, stopper dimension variation | Align station, prevent splashing, verify stopper quality |
| Missing stoppers | Chute jam, bowl starvation, pick-up failure | Tune bowl, check chute, maintain vacuum heads |
| Stoppers sticking together | Inadequate siliconisation, static | Review stopper treatment with supplier |
| Fill weight variation | Air in line, worn pump parts, temperature changes | Prime properly, maintain pumps, control temperature |
| Foaming or wet necks | Nozzle not diving, fill too fast | Adjust dive profile and fill speed |
| Partial stoppers falling out | Insertion too shallow | Adjust partial insertion height |
| Frequent interventions | Jams and feeding problems | Fix root causes, improve machine design |
Best Practices for a Reliable Process
- Use consistent, high-quality vials and stoppers with tight dimensional tolerances.
- Validate stopper preparation or use ready-to-use stoppers from qualified suppliers.
- Tune stopper bowls and chutes for each stopper type and record the settings.
- Prime and degas the product path before filling begins.
- Set nozzle profiles to prevent foaming and keep necks dry.
- Verify stopper height at start-up and after any adjustment.
- Keep interventions to a minimum and track them per batch.
- Follow validated cleaning and sterilisation for all product-contact parts — see our practical guide to vial filling machine cleaning and sterilization.
- Maintain machines preventively, especially pump seals, nozzles, vacuum heads and star wheels.
- Train operators on both normal operation and approved intervention procedures.
Special Considerations for Sensitive Products
Biologics, vaccines and other sensitive products bring extra demands: gentle dosing to avoid shear, minimal hold-up volume, careful temperature control and stopper materials that minimise interaction with the product. Peristaltic dosing with single-use tubing and coated stoppers are often preferred. Learn more in our article on vial filling solutions for biologics, vaccines and temperature-sensitive drugs.
Choosing a Filling and Stoppering Machine
When selecting a machine, consider:
- Product type: liquid, powder or lyophilised
- Fill volume range and accuracy required
- Output: two, four, six or more heads — for example, the Six Head Liquid Vial Filling & Stoppering Machine for higher volumes
- Stoppering method and partial-stoppering capability
- Vial and stopper size range and changeover time
- Barrier compatibility: laminar airflow, RABS or isolator
- Documentation and validation support
Explore our injectable liquid vial filling line range and the vial filling machines for liquid vials on Harsiddh Engineering.
Frequently Asked Questions
Why are filling and stoppering done on the same machine? To minimise the time a filled vial stays open, reduce handling and keep both steps within the Grade A zone, lowering contamination risk.
What is the difference between full and partial stoppering? Full stoppering seals liquid products immediately. Partial stoppering leaves vents open for freeze-drying, after which stoppers are pressed fully home inside the freeze dryer.
Why are rubber stoppers siliconised? Siliconisation reduces friction so stoppers feed smoothly, do not stick together and insert easily into the vial neck.
How are missing stoppers detected? Sensors after the stoppering station check stopper presence and height on every vial, and reject any that fail.
What causes raised stoppers? Common causes include misalignment at the stoppering station, liquid on the vial neck, stopper or vial dimensional variation and incorrect insertion settings.
Need a reliable vial filling and stoppering solution? Contact our team or send an inquiry to discuss your requirements.