
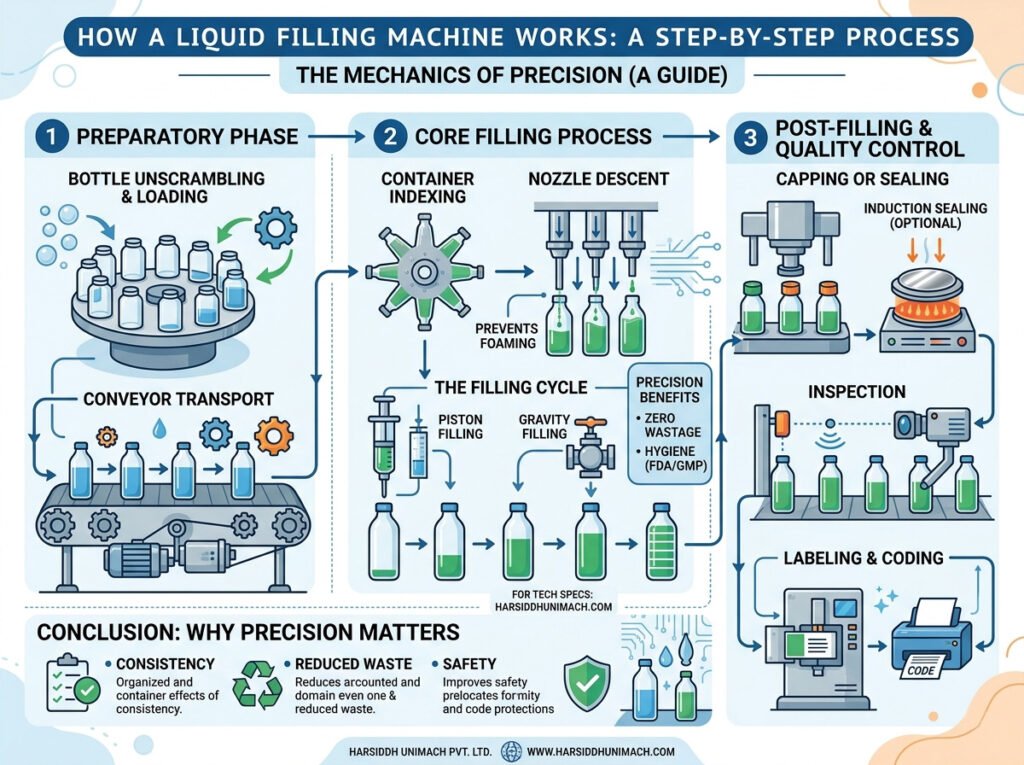
From the outside, a liquid filling machine looks simple: empty bottles go in one end and full bottles come out the other. Inside, however, a carefully timed sequence of mechanical, pneumatic and electronic actions takes place for every container — positioning it precisely, measuring an exact dose, delivering it without splashing or dripping, and moving it on without a moment’s hesitation.
Understanding this sequence helps you run a machine better, troubleshoot problems faster and choose the right equipment when you buy. In this guide, we walk through the complete working process of an automatic liquid filling machine, step by step, and show how it fits into a full bottle filling line. If you are completely new to the subject, start with our complete beginner’s guide to liquid filling machines.
The Process at a Glance
A typical automatic liquid filling line works in this order:
- Product preparation and supply
- Container infeed and unscrambling
- Container cleaning
- Conveying and indexing
- Nozzle positioning
- Dosing (filling)
- Drip control
- Discharge
- Capping
- Sealing and accessories
- Inspection
- Labelling and packing
Let’s look at each step in detail.
Step 1: Product Preparation and Supply
Filling starts before the first bottle arrives. The liquid is prepared in a manufacturing vessel — mixed, filtered and, if necessary, heated or cooled — and transferred to the filling machine’s buffer tank or hopper.
The buffer tank keeps a steady supply of product at the filling station. A level sensor controls a transfer pump or valve, topping up the tank automatically so the level stays within a narrow band. This matters because many filling technologies, especially gravity fillers, depend on a constant liquid head for consistent doses. For products that separate or settle, such as suspensions, a stirrer keeps the liquid uniform throughout the batch.
Step 2: Container Infeed and Unscrambling
Empty containers must arrive at the machine upright, correctly spaced and in a steady stream. On small lines, operators place bottles onto the conveyor or a rotary turntable by hand. On automatic lines, a bottle unscrambler takes loose bottles from a bulk hopper, orients them and feeds them onto the conveyor. See our range of bottle unscramblers.
Step 3: Container Cleaning
Before filling, containers are cleaned to remove dust, fibres and loose particles from manufacturing and transport. Two main methods are used:
- Air-jet and vacuum cleaning: bottles are inverted while ionised air blows particles out and a vacuum extracts them — a fast, waterless method suitable for many oral liquids and cosmetics. See our automatic bottle airjet and vacuum cleaning machine.
- Water washing: bottles are rinsed inside and out with water and then blown dry with filtered air. This is used where higher cleanliness is required, for example on a linear bottle washing machine.
Step 4: Conveying and Indexing
Clean containers travel along a slat chain conveyor towards the filling station. Here the machine must hold a group of containers perfectly still under the nozzles. There are two common methods:
- Intermittent (indexing) motion: pneumatic stopper gates or a star wheel let a set number of bottles — matching the number of nozzles — enter the filling zone and hold them there. After filling, the gates open, the filled bottles leave, and the next group enters. Most inline machines work this way.
- Continuous motion: on rotary machines, containers move continuously on a carousel while the nozzles travel with them, filling on the move. This allows higher speeds but is more complex and costly.
Sensors along the conveyor count bottles and detect gaps or jams. If a container is missing, the machine’s “no bottle, no fill” logic prevents that nozzle from dispensing.
Step 5: Nozzle Positioning
Once the containers are in position, the nozzle assembly moves into place. Depending on the product, nozzles either:
- Stop just above the container mouth – suitable for still, non-foaming liquids; or
- Dive into the container – going down close to the bottom and rising as the liquid level increases. Bottom-up filling reduces foaming, splashing and air entrapment, and is essential for products such as shampoos, detergents and some syrups.
Neck centring devices guide the containers so the nozzle enters cleanly, especially for narrow necks.
Step 6: Dosing — The Heart of the Machine
This is the step that defines the machine. How the dose is measured depends on the filling technology. Our article on liquid filling machine working principles explores the physics behind each method; here is how each one works in practice.
Gravity filling
Product flows from an overhead tank through a valve that opens for a set time. Since the liquid head is constant, a fixed time gives a fixed volume. It is simple and economical for thin, free-flowing liquids. Example: the Automatic Gravity Based Liquid Filling Machine.
Piston (volumetric) filling
A piston moves back inside a cylinder, drawing product in through a non-return or rotary valve. The valve then switches and the piston moves forward, pushing the measured volume out through the nozzle. The stroke length sets the volume. On servo models, the stroke and speed are set electronically for each recipe. See our servo based piston filling machine.
Gear pump filling
A servo motor turns a precision gear pump a set number of revolutions, delivering a measured volume with smooth, low-pulsation flow — well suited to oils and medium-viscosity liquids. See the servo based gear pump filling machine.
Peristaltic filling
Rollers squeeze a flexible tube, pushing product forward in precise increments. The product only touches the tube, which makes cleaning easy and cross-contamination impossible. This method suits small volumes and sensitive products. Example: the Automatic Peristaltic Based Liquid Filling Machine.
Load cell filling
The container sits on a weighing platform during filling. The valve opens fully for a fast fill, slows down near the target and closes once the target weight is reached — ensuring every container receives the correct net weight.
Most modern machines use servo motors to drive the dosing system, giving exceptional repeatability and quick changeovers. Learn more in servo based liquid filling machines explained.
Step 7: Drip Control
At the end of each dose, a small amount of product can hang on the nozzle tip and drip onto the bottle neck or conveyor. Drips waste product, make containers sticky and can interfere with capping and labelling. Machines prevent this with:
- Suck-back: the pump reverses slightly at the end of the dose, drawing the last drop back into the nozzle.
- Shut-off nozzles: a pneumatic needle or valve closes the nozzle tip instantly.
- Drip trays: a tray swings under the nozzles as they rise, catching anything that falls.
Step 8: Discharge
Once filling is complete, the nozzles rise, the stopper gates open and the filled containers move downstream on the conveyor. The next group of empty containers moves into position immediately and the cycle repeats. On a well-tuned machine, this entire cycle takes only a few seconds.
Step 9: Capping
Filled bottles must be closed quickly to prevent contamination and spills. Depending on the closure, capping machines apply:
- Screw caps, tightened to a set torque;
- ROPP (roll-on pilfer-proof) caps, formed onto the bottle thread by rollers; or
- Press-on caps, pumps and triggers.
The Automatic Four Head Bottle ROPP Capping Machine is a common choice for pharmaceutical syrups. Where space is limited, filling and capping can be combined in one liquid bottle filling and capping machine (monoblock).
Step 10: Sealing and Accessories
Many products need an extra layer of protection or an accessory before packing:
- Induction sealing: an aluminium foil liner inside the cap is heated by an electromagnetic field and bonded to the bottle mouth, providing a tamper-evident, leak-proof seal. See our induction sealing machine.
- Measuring cup placement: for syrups, a dosing cup is placed and pressed onto the cap automatically by an automatic measuring cup placement machine.
Step 11: Inspection
Before labelling, filled and capped containers are checked for fill level, cap presence, cap tightness, particles and leaks. On small lines, this is done manually at a bottle visual inspection table with controlled lighting. On larger lines, cameras and sensors check every container and reject defects automatically.
Step 12: Labelling and Packing
Finally, labels are applied and printed with batch number, manufacturing date and expiry date. A bottle sticker labeling machine applies wrap-around labels to round bottles at high speed, while other designs handle flat and oval containers. The labelled bottles are then cartoned, often with a product leaflet, and packed into shipper cartons ready for dispatch.
Matching Speeds Across the Line
A filling line is only as fast as its slowest machine. If the filler runs at 60 bottles per minute but the capper can only manage 45, bottles back up, the filler stops and starts, and efficiency falls. Good line design follows a few simple rules:
- Size the bottleneck deliberately. The filler is usually the critical machine, so upstream and downstream equipment is typically rated slightly faster to keep it running smoothly.
- Use accumulation. A short buffer table or accumulation conveyor between machines absorbs brief stoppages without halting the whole line.
- Synchronise controls. Sensors on the conveyor tell the filler to pause when the line ahead is full and to restart automatically when space is available.
- Plan for growth. Choosing a filler with spare nozzle capacity allows output to rise later without replacing the whole line.
The Role of the Control System
All of these steps are coordinated by a PLC (programmable logic controller) and an HMI touchscreen. The control system:
- Stores recipes for each product and container size;
- Sets fill volume, nozzle speed, diving profile and conveyor speed;
- Monitors sensors and stops the machine if a fault occurs;
- Counts production and records alarms; and
- Synchronises the filler with upstream and downstream machines.
A well-designed control system makes the machine easy to operate and reduces dependence on highly skilled operators.
Setting Up the Machine: Changeovers
When switching to a new product or container size, operators typically:
- Clean or replace product-contact parts;
- Fit change parts such as guides, star wheels and nozzles;
- Select the correct recipe on the HMI;
- Adjust conveyor guides and nozzle height; and
- Run test fills and verify accuracy by weighing samples.
Reducing changeover time increases productive hours. Our article on improving liquid filling machine changeover time explains practical engineering methods.
Common Problems and Quick Fixes
| Problem | Likely Cause | Quick Fix |
|---|---|---|
| Inconsistent fill volume | Air in product line, worn seals, low tank level | Prime the system, replace seals, check level control |
| Foaming or overflow | Fill speed too high, nozzle not diving | Slow initial fill, use bottom-up filling |
| Dripping nozzles | Suck-back not set, worn valve | Adjust suck-back, service nozzle valve |
| Bottles jamming | Incorrect guide width, damaged containers | Reset guides, inspect container quality |
| Nozzle misses bottle neck | Poor centring, conveyor speed mismatch | Adjust centring device and timing |
Frequently Asked Questions
How does a liquid filling machine measure the correct amount? It uses a dosing system — a timed valve (gravity), a piston stroke, pump revolutions (gear or peristaltic) or a weighing cell (load cell) — to deliver the set volume or weight into each container.
What is the difference between intermittent and continuous filling? Intermittent machines stop containers under the nozzles to fill them, while continuous (rotary) machines fill containers as they move, allowing higher speeds.
Why do some nozzles dive into the bottle? Diving nozzles fill from the bottom up, reducing foaming, splashing and trapped air — especially important for foamy or viscous products.
What happens if a bottle is missing? Sensors detect the gap, and “no bottle, no fill” logic stops that nozzle from dispensing, preventing spills and product loss.
Which steps come after filling? Typically capping, induction sealing or accessory placement, inspection, labelling and packing.
Want to see which liquid filling machine suits your product? Explore our liquid filling machines, browse the Automatic Liquid Bottle Filling Machine, or contact our team to discuss your requirements.