
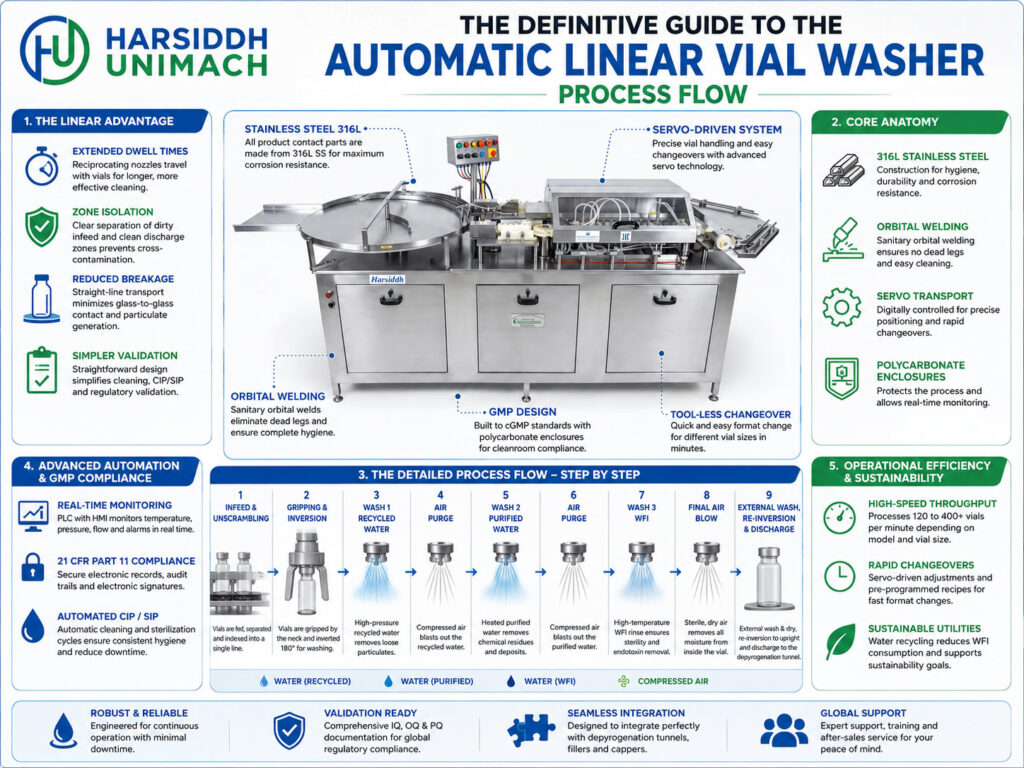
Every injectable vial line begins with washing. Before a vial is sterilised, filled and sealed, it must be cleaned inside and out to remove glass particles, dust, fibres and residues left from manufacturing and transport. On most commercial lines, that job is done by an automatic linear vial washer — a machine that moves vials in a straight line through a carefully planned sequence of cleaning stations and delivers them directly into the sterilising tunnel.
Understanding the process flow inside the washer helps operators run it correctly, helps engineers troubleshoot it quickly and helps buyers compare machines meaningfully. In this definitive guide, we follow a vial through every stage of a typical automatic linear vial washer, explain what happens at each station and why, and cover the utilities, controls, settings and maintenance that keep the process consistent.
If you are interested in how linear washing supports sterility specifically, read our companion article on how automatic linear vial washers improve sterility in injectable manufacturing.
Process Flow at a Glance
A typical automatic linear vial washer follows this sequence:
- Vial infeed
- Ultrasonic pre-cleaning bath
- Vial gripping and inversion
- Internal and external washing — recirculated water
- Compressed air blow
- Internal and external washing — recirculated water (second pass)
- Compressed air blow
- Final rinse — fresh purified water or WFI
- Final compressed air blows
- Return to upright position
- Outfeed into the sterilising tunnel
Exact station numbers and media sequences vary by machine model and process requirements. The flow described here represents common industry practice.
Stage 1: Vial Infeed
Empty vials are loaded onto an infeed turntable or tray table, usually by operators breaking open supplier packs in the washing room. The turntable rotates slowly, guiding vials towards the machine in a controlled stream.
From the turntable, vials move onto an infeed conveyor or into an infeed screw, which spaces them and delivers them to the washer at the correct rate. Guides keep vials upright and prevent tipping.
Why it matters: smooth, controlled infeed minimises glass-to-glass contact, which can chip vials and create new particles before washing even begins. Overloading the turntable is a common cause of breakage.
Stage 2: Ultrasonic Pre-Cleaning Bath
Vials enter a water bath, where they are submerged as they move through. Transducers fitted beneath or beside the bath generate high-frequency ultrasonic energy.
What happens
Ultrasonic waves create microscopic bubbles in the water that form and collapse rapidly — a process called cavitation. As bubbles collapse near the glass surface, they release energy that dislodges particles clinging to the inside and outside of the vial, including those held by static charge or surface adhesion.
Supporting details
- Vials fill with water as they are submerged, so internal surfaces are treated as well as external ones.
- Bath water is typically recirculated and filtered, with overflow to carry floating particles away.
- Bath temperature may be controlled to improve cleaning.
Why it matters: ultrasonic pre-cleaning loosens stubborn contamination that jets alone may not remove, making the later washing stages far more effective.
Stage 3: Vial Gripping and Inversion
After the bath, vials must be turned upside down so they can be washed internally with needles and drained effectively.
How it works
Depending on the design, vials are picked up in rows by grippers mounted on a carrier, or lifted by a walking-beam or rack system. The mechanism turns the vials through 180°, so their mouths face downward, and positions them above the washing needles.
Vials are then indexed forward in rows, station by station, typically in an intermittent motion that holds them still while needles enter and jets are delivered.
Why it matters: inverted washing allows water and loosened particles to drain out of the vial immediately by gravity. Gentle, accurate gripping prevents scratches and breakage.
Stage 4: First Washing Station — Recirculated Water
Washing needles rise into each inverted vial and spray recirculated, filtered water against the base and walls. At the same time, external nozzles spray the outside of the vials.
Why it matters: this first wash removes most of the remaining loose particles and residues. Using recirculated water here conserves fresh purified water and WFI for the final stages, where cleanliness matters most.
Stage 5: First Compressed Air Blow
The needles then deliver filtered compressed air into the vials, blowing out water and loosened contaminants. External air nozzles remove water from the outer surfaces.
Why it matters: alternating water and air creates a scrubbing effect and clears dirty water from the vial before the next rinse, so contamination is removed rather than diluted.
Stage 6: Second Washing Station — Recirculated Water
Many machines include a second recirculated water wash to further reduce particle levels before the final rinse.
Why it matters: each additional water-and-air cycle lowers contamination progressively, increasing the margin of safety.
Stage 7: Second Compressed Air Blow
Another blast of filtered compressed air removes water from the second wash, preparing the vial for the final rinse.
Stage 8: Final Rinse — Fresh Purified Water or WFI
The final rinse uses fresh water of the specified quality — typically Water for Injection for parenteral products. This water is not recirculated within the same station; after use, it is often directed to the recirculation tank to supply the earlier washing stages.
Why it matters: the final rinse defines the cleanliness of the vial surface leaving the washer. Using fresh, high-quality water here ensures that vials enter the tunnel clean, while recycling it upstream makes efficient use of an expensive utility.
Stage 9: Final Compressed Air Blows
One or more final air blows remove as much water as possible from inside and outside the vial. The compressed air used at this stage must be oil-free and pass through sterile-grade filters.
Why it matters: vials should enter the tunnel with minimal residual water. Excess water increases the energy and time needed for drying in the tunnel and can affect temperature profiles.
Stage 10: Return to Upright Position
The gripping system turns the vials back to the upright position and releases them onto the outfeed.
Stage 11: Outfeed Into the Sterilising Tunnel
On integrated lines, vials move directly from the washer outfeed into the infeed zone of the depyrogenation tunnel, typically under unidirectional filtered airflow. In the tunnel, vials are dried, sterilised, depyrogenated and cooled before reaching the filling machine. See our sterilizing tunnel for ampoules and vials.
Why it matters: a direct, protected transfer avoids manual handling of clean, wet vials and reduces the risk of recontamination.
Station Summary Table
| Stage | Medium | Purpose |
|---|---|---|
| Ultrasonic bath | Recirculated, filtered water | Loosen adhered particles |
| Wash 1 | Recirculated water (internal and external) | Remove bulk contamination |
| Air 1 | Filtered compressed air | Blow out water and debris |
| Wash 2 | Recirculated water | Further reduce contamination |
| Air 2 | Filtered compressed air | Clear water before final rinse |
| Final rinse | Fresh purified water / WFI | Final cleaning with highest quality water |
| Final air | Sterile-filtered compressed air | Remove residual water |
| Outfeed | — | Protected transfer to tunnel |
Utilities Required
A linear vial washer depends on reliable utilities:
- Purified water and/or WFI at the specified pressure and temperature
- Clean, oil-free compressed air, filtered appropriately for vial contact
- Electrical supply for drives, pumps, heaters and ultrasonic generators
- Drainage for wastewater
- Recirculation tank and pump with filtration
Undersized or unstable utilities are a frequent cause of washing problems. Our guide to utility requirements for pharmaceutical filling plants explains how to plan utilities properly.
Controls and Monitoring
Modern linear washers use a PLC and HMI to control and monitor the process:
- Pressure monitoring for water and air at each station
- Flow monitoring for critical media
- Temperature control for heated water and the ultrasonic bath
- Level control in the recirculation tank and bath
- Interlocks that stop the machine or block vial flow if a parameter goes out of range
- No-vial detection to avoid spraying into empty positions
- Alarms and event logs for troubleshooting
- Recipe storage for different vial sizes
Key Process Parameters
| Parameter | Why It Matters |
|---|---|
| Water pressure at each station | Determines jet cleaning force |
| Air pressure | Affects drying and particle removal |
| Final rinse water quality | Defines final surface cleanliness |
| Needle penetration depth | Ensures jets reach the vial base |
| Dwell time per station | Controls contact time for cleaning |
| Ultrasonic power and bath temperature | Influence particle loosening |
| Machine speed | Must match tunnel and filler capacity |
| Filter condition | Affects pressure and particle carry-over |
Changeover Between Vial Sizes
When switching vial sizes, operators typically:
- Empty the machine and infeed of all vials.
- Change infeed parts, guides and gripper fingers or carriers.
- Adjust or change needle sets and nozzle positions.
- Select the correct recipe on the HMI.
- Verify needle alignment and penetration with a few test vials.
- Run trial vials and check washing results before production.
Clearly labelled change parts and stored recipes make changeovers faster and more repeatable. For general guidance, see our changeover best practices for vial lines.
Common Process Problems and Causes
| Problem | Likely Cause |
|---|---|
| Particles remaining in vials | Blocked needles, low pressure, clogged filters, ultrasonic fault |
| Water left in vials | Insufficient air pressure, worn air nozzles, incorrect timing |
| Vial breakage | Wrong change parts, misaligned grippers, overcrowded infeed |
| Vials falling during inversion | Worn gripper fingers, incorrect gripper setting |
| Pressure alarms | Filter blockage, pump issues, utility supply problems |
| Inconsistent results across rows | Uneven needle alignment or partially blocked nozzles |
Maintenance for Consistent Process Flow
- Daily: inspect needles and nozzles, check pressures, clean the infeed area
- Weekly or by running hours: check gripper fingers and seals, inspect filters, clean the ultrasonic bath
- Periodically: service pumps and valves, check transducers, calibrate gauges and sensors
- Spares to keep: needles, filters, gripper parts, seals, valves
Linear vs Rotary: Where the Process Differs
Rotary washers carry vials individually around a circle and wash them continuously, usually without a separate ultrasonic bath. Linear washers process vials in rows, accommodate more stations and connect directly to the tunnel. For a full comparison, read rotary vs linear vial washing machines: the definitive engineering comparison, and see our rotary vial washing machine for the alternative design.
Related Washing Equipment
- External vial washing after capping removes residue before labelling — see our automatic external vial washing machine.
- Ampoule washing follows similar principles for glass ampoules — see our ampoule washing machine range.
- Bottle washing for oral liquids uses comparable stations on a linear bottle washing machine.
Machines to Explore
- Automatic Linear Vial Washer
- Automatic Linear Tunnel Type Vial Washing Machine
- Linear vial washer and linear vial washing machine on Harsiddh Engineering
- For a complete integrated system, the Automatic Liquid Vial Filling Line (Compact Line), which feeds washed and sterilised vials to a filler such as our liquid vial filling machine with rubber stoppering
For help choosing between washing machines, see how to select the right pharmaceutical washing machine for your plant.
Frequently Asked Questions
What is the process flow of a linear vial washer? Vials are fed in, pre-cleaned in an ultrasonic bath, gripped and inverted, washed with alternating water and air jets, given a final rinse with fresh water, dried with filtered air, turned upright and transferred to the sterilising tunnel.
Why are water and air alternated? Air blows out dirty water and loosened particles after each wash, so contamination is removed rather than diluted.
Why is fresh water used only for the final rinse? Fresh purified water or WFI is expensive. Using recirculated water in early stages and fresh water only at the end gives the cleanest final result while conserving water.
What does the ultrasonic bath do? It uses cavitation to loosen particles that cling tightly to the glass, improving the effectiveness of later jet washing.
How long does changeover take? It depends on the machine and vial sizes. Labelled change parts and stored recipes help keep changeovers short and consistent.