
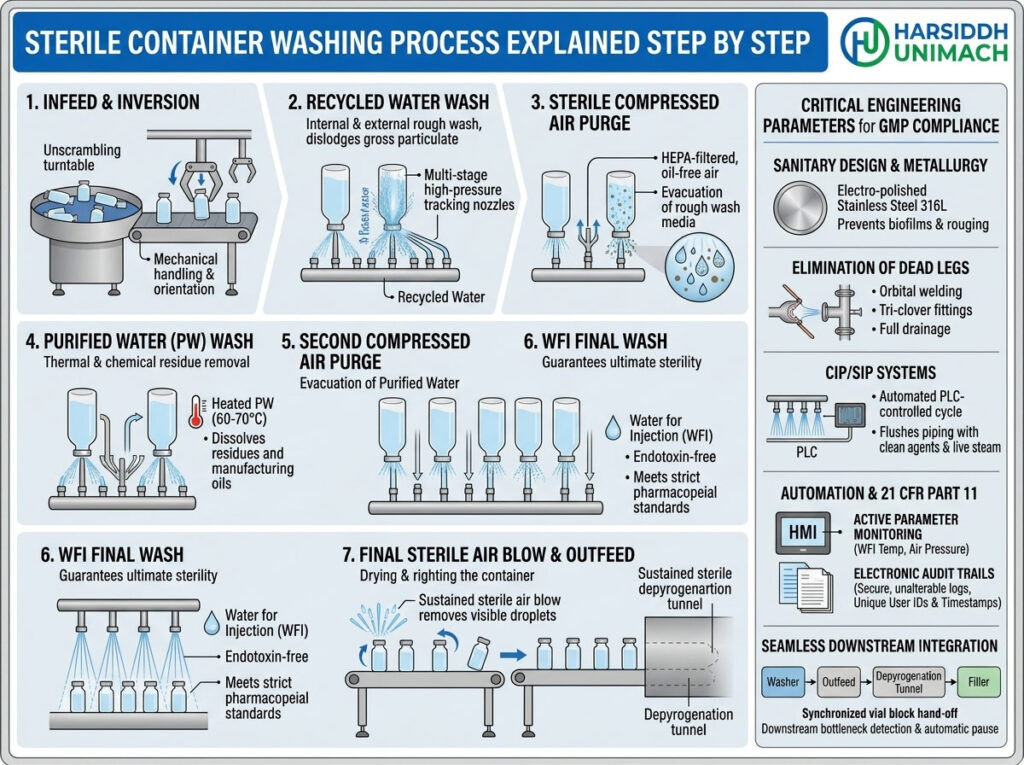
In sterile injectable manufacturing, the container is the product’s first line of protection — and potentially its first source of contamination. Glass vials and ampoules leave the glass manufacturer clean by industrial standards, but not by pharmaceutical standards. During forming, annealing, packing and transport, they pick up glass particles, dust, fibres, packaging debris and microbial contamination. Before they can hold a sterile drug, every container must go through a controlled, validated washing and depyrogenation process.
This article walks through the complete sterile container washing process, step by step — from the moment containers arrive at the plant to the moment they enter the Grade A filling zone. We explain what happens at each stage, why it matters, which utilities and controls are involved and how the process is validated. For a detailed station-by-station look at one machine type, see our guide to the automatic linear vial washer process flow.
Why Containers Must Be Washed
Containers for injectables must be free from:
- Visible particles – glass fragments, dust, fibres and packaging debris
- Sub-visible particles – small particles that may still affect product quality
- Microorganisms – bacteria, moulds and spores
- Endotoxins (pyrogens) – heat-stable fragments of bacterial cell walls that can cause fever and serious reactions when injected
- Chemical residues – from manufacturing, handling and packaging
Washing removes particles and reduces microbial and endotoxin load. The depyrogenation step that follows destroys remaining microorganisms and endotoxins. Together, they deliver sterile, pyrogen-free containers ready for filling.
Overview of the Process
- Receiving and incoming inspection
- De-cartoning and loading
- Pre-cleaning (ultrasonic or initial rinse)
- Internal and external washing with recirculated water
- Intermediate compressed air purges
- Final rinse with Water for Injection
- Final drying with filtered compressed air
- Protected transfer to the depyrogenation tunnel
- Drying, sterilisation and depyrogenation
- Cooling under unidirectional airflow
- Entry into the Grade A filling zone
Step 1: Receiving and Incoming Inspection
Containers arrive from approved suppliers in sealed packs, often shrink-wrapped trays or boxes. On receipt:
- Delivery documents and certificates of analysis are checked
- Packaging is inspected for damage, moisture or contamination
- Samples are taken for quality testing — dimensions, glass type, visual defects
- Containers are quarantined until released by quality
Why it matters: washing cannot correct defective containers. Dimensional variation affects machine handling, and cracked or chipped glass creates particles.
Step 2: De-Cartoning and Loading
Released containers are moved to the washing area, which is usually a classified cleanroom of lower grade than the filling area. Operators remove outer packaging in a separate zone to keep cardboard dust out of the washing room, then load containers onto the washer’s infeed turntable or tray.
Best practices:
- Remove outer cartons outside the washing room
- Avoid overloading turntables to prevent glass-to-glass impacts
- Handle trays gently to avoid chipping
Step 3: Pre-Cleaning
Ultrasonic cleaning
Many washers — particularly linear vial washers — pass containers through an ultrasonic water bath. Ultrasonic energy creates microscopic cavitation bubbles that dislodge tightly adhered particles from glass surfaces.
Initial rinse
On machines without ultrasonic baths, an initial water rinse performs a similar role, loosening and removing the bulk of surface contamination.
Why it matters: pre-cleaning makes subsequent washing stages much more effective by removing contamination that would otherwise resist jet washing.
Step 4: Internal and External Washing With Recirculated Water
Containers are inverted so their mouths face downward. Needles enter each container and spray water against the internal walls and base, while external nozzles clean the outer surfaces.
Early washing stages typically use recirculated water — water collected from the final rinse, filtered and pumped back for reuse.
Why it matters: inversion allows water and particles to drain out immediately. Using recirculated water in early stages conserves expensive WFI for the final rinse.
Step 5: Intermediate Compressed Air Purges
Between water washes, filtered compressed air is blown into and around the containers.
Why it matters: air purges remove dirty water and loosened particles so that the next rinse starts with a cleaner surface. Alternating water and air creates a scrubbing effect that is more effective than water alone.
Step 6: Final Rinse With Water for Injection
The last water stage uses fresh Water for Injection (WFI), delivered at controlled pressure and temperature. This rinse is not recirculated within the same station.
Why it matters: the final rinse defines the cleanliness of the surface that will contact the product. Using WFI ensures that no new contamination is introduced at this critical stage.
Step 7: Final Drying With Filtered Compressed Air
One or more air blows remove residual water from inside and outside each container. Compressed air for container contact must be oil-free and filtered through sterile-grade filters.
Why it matters: less residual water means faster, more consistent drying in the tunnel and reduces the risk of water spots or carry-over.
Step 8: Protected Transfer to the Depyrogenation Tunnel
Washed containers are turned upright and transferred to the tunnel infeed. On integrated lines, this happens automatically and directly, typically under filtered unidirectional airflow.
Why it matters: freshly washed, wet containers are vulnerable to airborne contamination. A direct, protected transfer avoids manual handling and exposure.
Step 9: Drying, Sterilisation and Depyrogenation
Inside the tunnel, containers pass through a hot zone with HEPA-filtered, heated air. The high temperature:
- Dries any remaining moisture
- Sterilises the containers by destroying microorganisms
- Depyrogenates them by destroying endotoxins
The temperature profile, exposure time and belt speed are validated to achieve the required level of endotoxin reduction. See our sterilizing tunnel for ampoules and vials and the wider sterilizers range.
Step 10: Cooling Under Unidirectional Airflow
After the hot zone, containers enter a cooling zone where filtered air brings them down to a safe temperature for filling. Pressure differentials and airflow protect them from contamination as they cool.
Why it matters: containers that are too hot can damage heat-sensitive products and cause filling problems.
Step 11: Entry Into the Grade A Filling Zone
The tunnel exit opens into the Grade A zone, where sterile, cooled containers move onto the filling machine’s infeed. From here, they are filled, stoppered or sealed under the strictest aseptic conditions.
How the Process Differs for Vials and Ampoules
Vials
Vials are washed on linear or rotary washers with internal needles and external sprays, then passed through a tunnel. Examples include the Automatic Linear Tunnel Type Vial Washing Machine, our linear vial washer and our rotary vial washing machine.
Ampoules
Ampoules have narrow necks, so needles must enter accurately without breaking the glass. Washing often uses rotary or multijet machines. Read about the ampoule washing machine working principle, and see the Automatic Rotary Ampoule Washing Machine, our rotary ampoule washing machine and our semi-automatic multijet ampoule washing machine.
Integrated ampoule lines
Compact systems combine washing, sterilising, filling and sealing for smaller footprints — for example, the automatic ampoule filling line (compact line).
External Washing After Filling
A second, separate washing step often takes place after filling and sealing: external washing. Machines such as the Automatic Ampoule External Washing Machine remove product residue and fingerprints from the outside of sealed containers and dry them before inspection and labelling. This step is about appearance and label adhesion rather than sterility.
Utilities That Make the Process Work
| Utility | Role | Key Controls |
|---|---|---|
| Purified water | Recirculation and early washing (as specified) | Quality monitoring |
| Water for Injection | Final rinse | Quality, temperature, pressure |
| Compressed air | Purges and drying | Oil-free, sterile-grade filtration, pressure |
| HEPA-filtered air | Tunnel and transfer zones | Airflow, pressure differentials |
| Electrical power | Washer, pumps, heaters, tunnel | Stable supply |
| Drainage | Wastewater removal | Adequate capacity |
Critical Process Parameters
- Water pressure and flow at each washing stage
- Final rinse water quality and temperature
- Compressed air pressure and filter condition
- Needle alignment and penetration depth
- Ultrasonic power and bath condition
- Tunnel temperature profile and belt speed
- Pressure differentials between washing, tunnel and filling areas
- Machine speed matched across washer, tunnel and filler
Validating the Washing and Depyrogenation Process
Washing validation
Particle challenge studies demonstrate the washer’s ability to reduce particles. Containers are deliberately contaminated, washed and then tested. Critical parameters are verified across vial or ampoule sizes and machine speeds.
Depyrogenation validation
Endotoxin challenge studies demonstrate the required reduction of endotoxin in the tunnel. Temperature mapping confirms that every container reaches the required temperature for the required time.
Ongoing monitoring
Sensors monitor critical parameters during each batch. Results from final product inspection — particularly particle rejects — provide continuing evidence that washing is effective. See our guide to cleaning and sterilisation in the vial filling machine cleaning and sterilization guide, and read about the importance of GMP compliance in pharmaceutical machinery.
What About Rubber Stoppers?
Containers are not the only components that need preparation. Rubber stoppers for vials are typically washed to remove particles and endotoxins, lightly siliconised to reduce friction, sterilised (usually by steam) and dried before use. Many manufacturers now buy ready-to-use or ready-to-sterilise stoppers from qualified suppliers, which reduces in-house processing. Either way, stopper preparation must be validated with the same rigour as container washing, because stoppers contact the product directly and are a frequent source of particles if poorly prepared.
Common Problems and Their Causes
| Problem | Likely Cause | Action |
|---|---|---|
| Particles found at inspection | Blocked needles, low pressure, ultrasonic fault, broken glass | Inspect needles, check pressures, review handling |
| Water spots or residual water | Weak air purge, clogged air filters | Check air pressure and filters |
| Container breakage | Wrong change parts, overloaded infeed, thermal shock | Correct setup, control loading, check tunnel profile |
| Endotoxin failures | Tunnel temperature or speed out of range | Investigate tunnel parameters and validation |
| Pressure alarms | Filter blockage, pump or utility issues | Replace filters, check utilities |
Best Practices for a Reliable Washing Process
- Qualify container suppliers and control incoming quality.
- Keep cardboard out of the washing room.
- Inspect needles and nozzles at every changeover.
- Monitor water and air quality continuously.
- Replace filters on a defined schedule.
- Match speeds between washer, tunnel and filler to avoid accumulation.
- Use direct, protected transfers between washer and tunnel.
- Trend particle rejects at inspection — such as on a visual ampoule and vial inspection machine — to detect early washing problems.
- Train operators on correct loading, changeover and response to alarms.
- Follow preventive maintenance for washers and tunnels.
Choosing the Right Washing Equipment
The right washer depends on container type, output, utilities and line layout. Our guide on how to select the right pharmaceutical washing machine for your plant covers the decision in detail. You can browse all options in our washing machine category and the washing machines on Harsiddh Engineering.
Frequently Asked Questions
What is the sterile container washing process? It is the sequence of steps that cleans vials or ampoules with water and air, finishing with a WFI rinse, before depyrogenation in a hot-air tunnel and transfer into the Grade A filling zone.
Does washing sterilise containers? No. Washing removes particles and reduces microbial and endotoxin load. Sterilisation and depyrogenation take place in the tunnel.
Why is WFI used for the final rinse? Because the final rinse defines the surface cleanliness of the container. WFI ensures no new contamination is introduced.
Why are containers washed upside down? So water and loosened particles drain out immediately instead of collecting inside.
What are endotoxins? Heat-stable fragments of bacterial cell walls that can cause fever and serious reactions if injected. They are destroyed by high-temperature depyrogenation.
Need help designing or upgrading your container washing process? Contact our team or send an inquiry to discuss your requirements.