
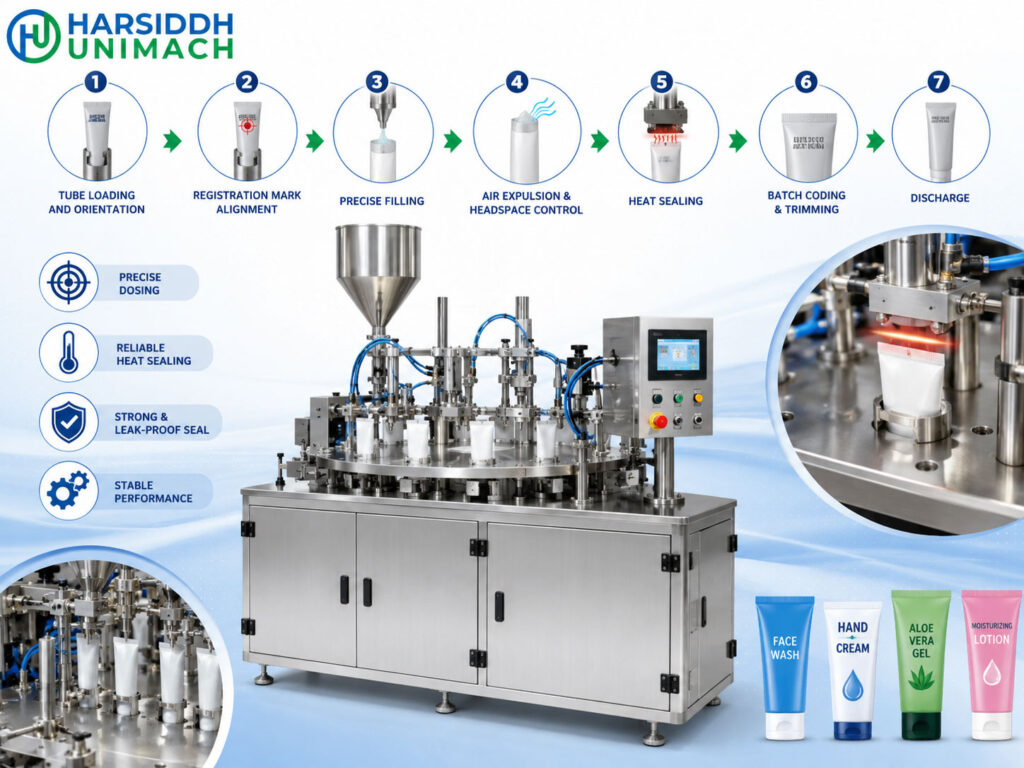
Walk down the personal care aisle of any shop and you will see hundreds of plastic and laminated tubes: face washes, sunscreens, hand creams, toothpastes, hair gels and medicated creams. Their soft, squeezable bodies and bright all-round printing make them popular with brands and consumers alike. What gives every one of those tubes its clean, flat, leak-proof end is a heat seal, made on a plastic tube filling and sealing machine in a fraction of a second.
Unlike aluminium tubes, which are folded and crimped mechanically, plastic and laminated tubes are sealed by melting and fusing the tube walls together. Getting that seal right depends on the tube material, the heat applied, the pressure, the cooling and, just as importantly, keeping product away from the sealing area.
This article focuses specifically on the plastic and lami tube process. For an overview of all tube types, including aluminium tubes, read our main guide to the tube filling machine working principle.
Understanding Plastic and Laminated Tubes
The sealing process starts with understanding what the tube is made of.
Plastic (extruded) tubes
Plastic tubes are usually made of polyethylene (PE), either as a single layer or as several co-extruded layers. Some multilayer plastic tubes include a barrier layer, such as EVOH, to reduce oxygen and aroma transfer. Plastic tubes are soft, recover their shape after squeezing and are widely used for cosmetics and personal care.
Laminated (lami) tubes
Laminated tubes are made from a flat multilayer laminate that is rolled into a tube and side-seamed. The two main families are:
- ABL (Aluminium Barrier Laminate) – includes a thin aluminium foil layer for a strong barrier against oxygen, moisture and light. Widely used for toothpaste and some pharmaceutical creams.
- PBL (Plastic Barrier Laminate) – uses a plastic barrier layer instead of foil. It offers a good barrier with a more fully plastic structure.
In both cases, the inner layer is a heat-sealable polymer, and that is the layer the machine melts and fuses.
Why the material matters to the machine
| Tube Type | Heating Behaviour | Practical Effect on Sealing |
|---|---|---|
| Mono-layer PE | Heats and softens quickly | Needs careful control to avoid over-melting |
| Co-extruded multilayer | Depends on layer structure | Settings vary between tube suppliers |
| ABL laminate | Foil layer conducts heat | Different heating and cooling balance from plastic tubes |
| PBL laminate | Behaves more like plastic | Settings closer to multilayer plastic tubes |
Because of these differences, sealing settings are always established for each tube specification, and ideally confirmed with samples from the actual tube supplier.
The Working Principle in One Paragraph
Empty tubes are loaded cap end down into holders on an indexing turret. Each tube is rotated until a sensor finds its printed eye mark, so the seal will line up with the artwork. A nozzle fills the tube from the bottom up with a measured dose from a piston pump and cuts off cleanly. Hot air is then blown onto the inside of the open end to melt the inner sealing layer, while the area below is kept cool. Sealing jaws press the softened walls together so they fuse, and cooling jaws set the seal. Finally, the seal is coded, trimmed and the tube is ejected.
Step-by-Step Working Process
Step 1: Tube loading
Tubes, with caps already fitted, are loaded into a magazine. The machine drops or pushes them one at a time into tube holders on the turret, cap end down. A pusher seats each tube fully so its open end sits at exactly the same height for every station. Consistent height is essential, because the heating nozzle and sealing jaws work at a fixed position.
Step 2: Orientation by eye mark
The tube holder rotates the tube while a photo sensor watches for a printed eye mark near the open end. When the mark is detected, rotation stops at a pre-set offset. This ensures the flat seal will sit at the correct angle relative to the front panel of the print, so every tube looks the same on the shelf.
Step 3: Air cleaning (optional)
A nozzle enters the tube and blows filtered air to remove dust or loose particles. This is especially useful for products where visible particles would be a defect.
Step 4: Bottom-up filling
The filling nozzle descends almost to the cap end. A piston pump with a rotary valve draws product from the hopper and then pushes the set volume through the nozzle. As product enters, the nozzle rises, keeping its tip just below the product surface. This reduces air pockets and keeps product off the inside walls near the open end.
The hopper may have a jacket for heating or cooling and a stirrer to keep the product uniform, depending on the formulation. Fill volume is adjusted through the piston stroke.
Popular fillers for this step are the Automatic Single Head Tube Filling Machine and the automatic single head tube filling machine (HTF-40A). For the filling side of semi-solid formulations, see our cream filling machine working principle.
Step 5: Clean cut-off
At the end of the fill, product flow must stop sharply. Machines use an air blow at the nozzle tip, a shut-off valve or a short piston suck-back. Any product smeared on the inner wall of the open end will contaminate the seal area and is the single most common cause of weak or leaking plastic tube seals.
Step 6: Hot air heating
The tube indexes to the heating station. A hot air nozzle descends into the open end of the tube. Air from a heater is blown through small holes directed at the inner wall, softening and melting the inner sealing layer around the full circumference.
At the same time, a cooling ring or cooling sleeve surrounds the tube just below the heating zone. Chilled water or cooled air keeps this area cool so that:
- Heat does not travel down into the product
- The tube body and print below the seal are not distorted
- The seal has a sharp, clean lower edge
Heating time, air temperature and air flow are the three main heating settings. Too little heat gives a weak seal; too much burns the inner layer, distorts the tube or creates “stringing” when the jaws open.
Step 7: Sealing jaws
Immediately after heating, the tube moves to the sealing station. A pair of jaws closes on the softened open end and presses the two walls together. Because the inner layers are molten, they fuse into a single, homogeneous seal.
Jaw pressure and dwell time are set so the walls fuse fully without squeezing out too much material. Jaws may carry a pattern, such as horizontal lines or a textured finish, which improves grip and appearance.
Step 8: Cooling
In many designs, the sealing jaws are water cooled, so the seal sets while it is still clamped. Other machines have a separate cooling station with chilled jaws. Proper cooling prevents the seal from re-opening, warping or sticking.
Step 9: Coding
A coding station embosses the batch number, manufacturing date and expiry date into the cooled seal. The code may be pressed by a separate coding die or combined with the sealing jaws.
Step 10: Trimming
A trimming station cuts the top edge of the seal to a straight, neat finish. Some machines can cut a decorative profile or a hang-hole for retail display.
Step 11: Ejection
The finished tube is pushed up out of its holder and onto an outfeed conveyor or into a cartoner. Empty holders return to the loading station.
Machines for Plastic and Lami Tubes
Semi-automatic plastic tube filling machines
The operator places each tube and the machine fills it, with sealing on the same machine or a separate sealer. Suitable for small batches, product trials and start-ups. See the Semi-Automatic Plastic Tube Filling Machine and the semi-automatic plastic tube filling machine.
Automatic lami tube filling and sealing machines
Fully automatic rotary machines with hot-air heating, sealing, coding and trimming. See the Automatic Lami Tube Filling Machine and the automatic lami tube filling machine.
Double head machines
Two filling and sealing positions per index increase output on the same footprint. See the Automatic Double Head Tube Filling Machine and the automatic double head tube filling machine (HTF-70A). For more on scaling up output, read high-speed tube filling machine: improve packaging efficiency.
When you need aluminium tubes instead
If your product needs the full barrier and no-suck-back behaviour of aluminium tubes, a folding and crimping machine is used instead of heat sealing. See the semi-automatic aluminium tube filling machine and the tube filling, crimping and batch coding machine.
Browse our full range of tube filling machines and the cream and ointment filling machines range. If you fill the same creams and gels into bottles as well as tubes, see the lotion and gel filling machine.
Key Sealing Parameters
| Parameter | What It Controls | Too Low | Too High |
|---|---|---|---|
| Hot air temperature | How much the inner layer melts | Weak, peelable seal | Burnt, distorted or stringy seal |
| Heating time | Heat absorbed by the tube wall | Incomplete fusion | Over-melting, tube distortion |
| Air flow | How evenly heat reaches the wall | Cold spots, partial seals | Material blown out of shape |
| Cooling ring flow | Protection of tube body and product | Distortion below seal | Seal area cooled before sealing |
| Jaw pressure | Fusion of the two walls | Channels and leaks | Thin, weakened seal edges |
| Jaw dwell time | Time for fusion and setting | Seal re-opens | Reduced output |
| Tube height | Position of the seal zone | Heat in the wrong place | Seal too short or too long |
Testing Seal Quality
Plastic tube seals are commonly checked with a combination of:
- Squeeze test – the filled tube is squeezed firmly by hand or with a fixture to see whether the seal opens or leaks
- Pressure or burst test – air pressure is applied to a sample tube to find the point at which the seal fails
- Peel test – an empty sealed tube end is pulled apart to check that the walls have fused and not just stuck together
- Visual inspection – the seal should be flat, even, straight, correctly positioned and free of burns, wrinkles or product inclusions
- Code check – batch, manufacturing and expiry details clear and correct
The required test methods and limits should be agreed with your quality team and tube supplier.
Troubleshooting Plastic Tube Sealing Problems
| Defect | Likely Cause | Corrective Action |
|---|---|---|
| Seal leaks under pressure | Product on the seal area, low heat, low jaw pressure | Improve cut-off, raise heat or pressure |
| Seal peels open easily | Inner layer not fully melted | Increase temperature or heating time |
| Burnt or discoloured seal | Excessive heat | Reduce temperature, shorten heating time |
| Wrinkled or folded seal | Tube not centred, uneven heating | Check tube holders and nozzle alignment |
| Stringing when jaws open | Over-melting | Reduce heat, improve cooling |
| Tube body distorted below seal | Poor cooling ring performance | Check chilled water flow and ring position |
| Seal not square to print | Eye mark sensor error | Re-teach sensor, check tube print |
| Uneven trim | Worn or misaligned cutter | Replace or adjust cutter |
| Variation between shifts | Changing tube lots or ambient conditions | Verify settings with each new tube lot |
Maintenance Tips
- Clean hot air nozzles regularly; blocked holes create cold spots.
- Check heater elements and temperature sensors for accurate readings.
- Inspect the cooling system for flow, leaks and scale.
- Keep sealing and cooling jaws clean, parallel and free from damage.
- Sharpen or replace trimming knives on schedule.
- Clean and check the eye mark sensor.
- Inspect piston seals and valves on the filling pump.
Downstream: Labelling and Cartoning
Many plastic and lami tubes are pre-printed, but some products need an additional label for variable data or regulatory text. Browse the labeling machines on Harsiddh Engineering, or see the Automatic Tube Labeling Machine. Tubes are then cartoned with a leaflet where required.
How to Choose a Plastic Tube Filling and Sealing Machine
- Tube types – mono PE, co-extruded, ABL or PBL
- Tube diameters and lengths
- Product – viscosity, temperature sensitivity, need for heating or stirring
- Fill volume range
- Output – semi-automatic, single head or double head
- Sealing features – hot-air system, cooling, coding and trimming profiles
- Hygiene and GMP for pharmaceutical products
- Integration with labelling and cartoning
Frequently Asked Questions
How does a plastic tube filling and sealing machine work? It loads tubes cap down, orients them by eye mark, fills them bottom-up with a piston pump, melts the inner layer of the open end with hot air, presses the walls together with sealing jaws, cools, codes and trims the seal, and ejects the tube.
Why is hot air used instead of heated jaws alone? Hot air heats the inner sealing layer directly and evenly from inside the tube, which suits multilayer plastic and laminated tubes.
What is the difference between ABL and PBL tubes? ABL tubes include an aluminium foil barrier layer. PBL tubes use a plastic barrier layer instead.
What causes plastic tube seals to leak? Most often, product contamination in the seal area, followed by insufficient heat or jaw pressure.
Do settings change between tube suppliers? Yes. Different tube materials and layer structures need different heat, time and pressure settings, so settings should be verified with each tube specification.
Need a reliable plastic or lami tube filling and sealing machine? Contact our team or send an inquiry with your tube specifications and product details.